
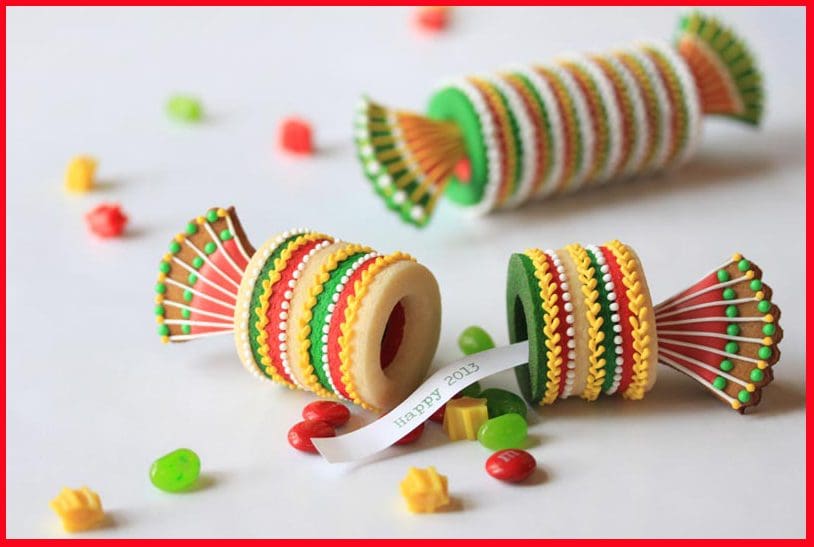
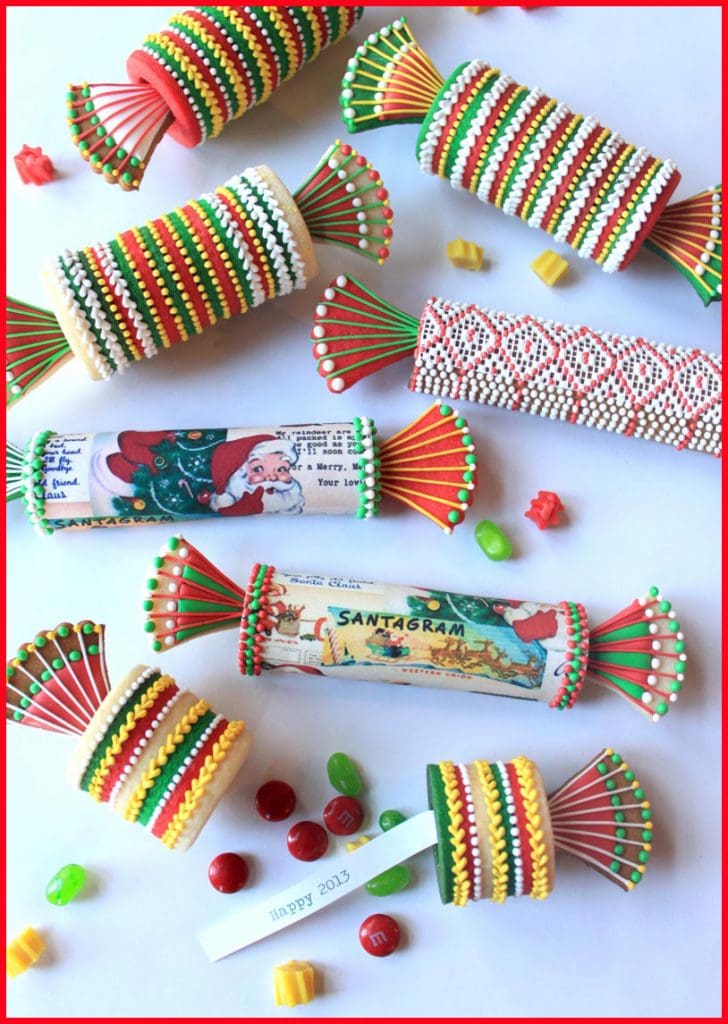
If you hadn’t already gathered, I have a sweet spot for 3-D cookies that resemble things you never thought they could be – like these holiday cookie crackers filled with candies and special messages. I originally designed them for party favors on New Year’s Eve 2013 (hence the messages inside). But you can change out colors, messages, and other decorating details to turn them into birthday, wedding, anniversary, or just about any other type of gift. I’ve made the cookie tubes in two different ways – as “wrapped” half-cylinders and as stacks of cookie “O-rings.” Though the latter approach involves more cookie pieces, it’s actually a tad easier, especially if you’ve never wrapped cookie dough before. At any rate, I provide both options – so take your pick!
What you’ll need for one holiday cracker:

To make:
1 | Prepare your cookie pieces. Choose your favorite sugar cookie (or gingerbread) dough.
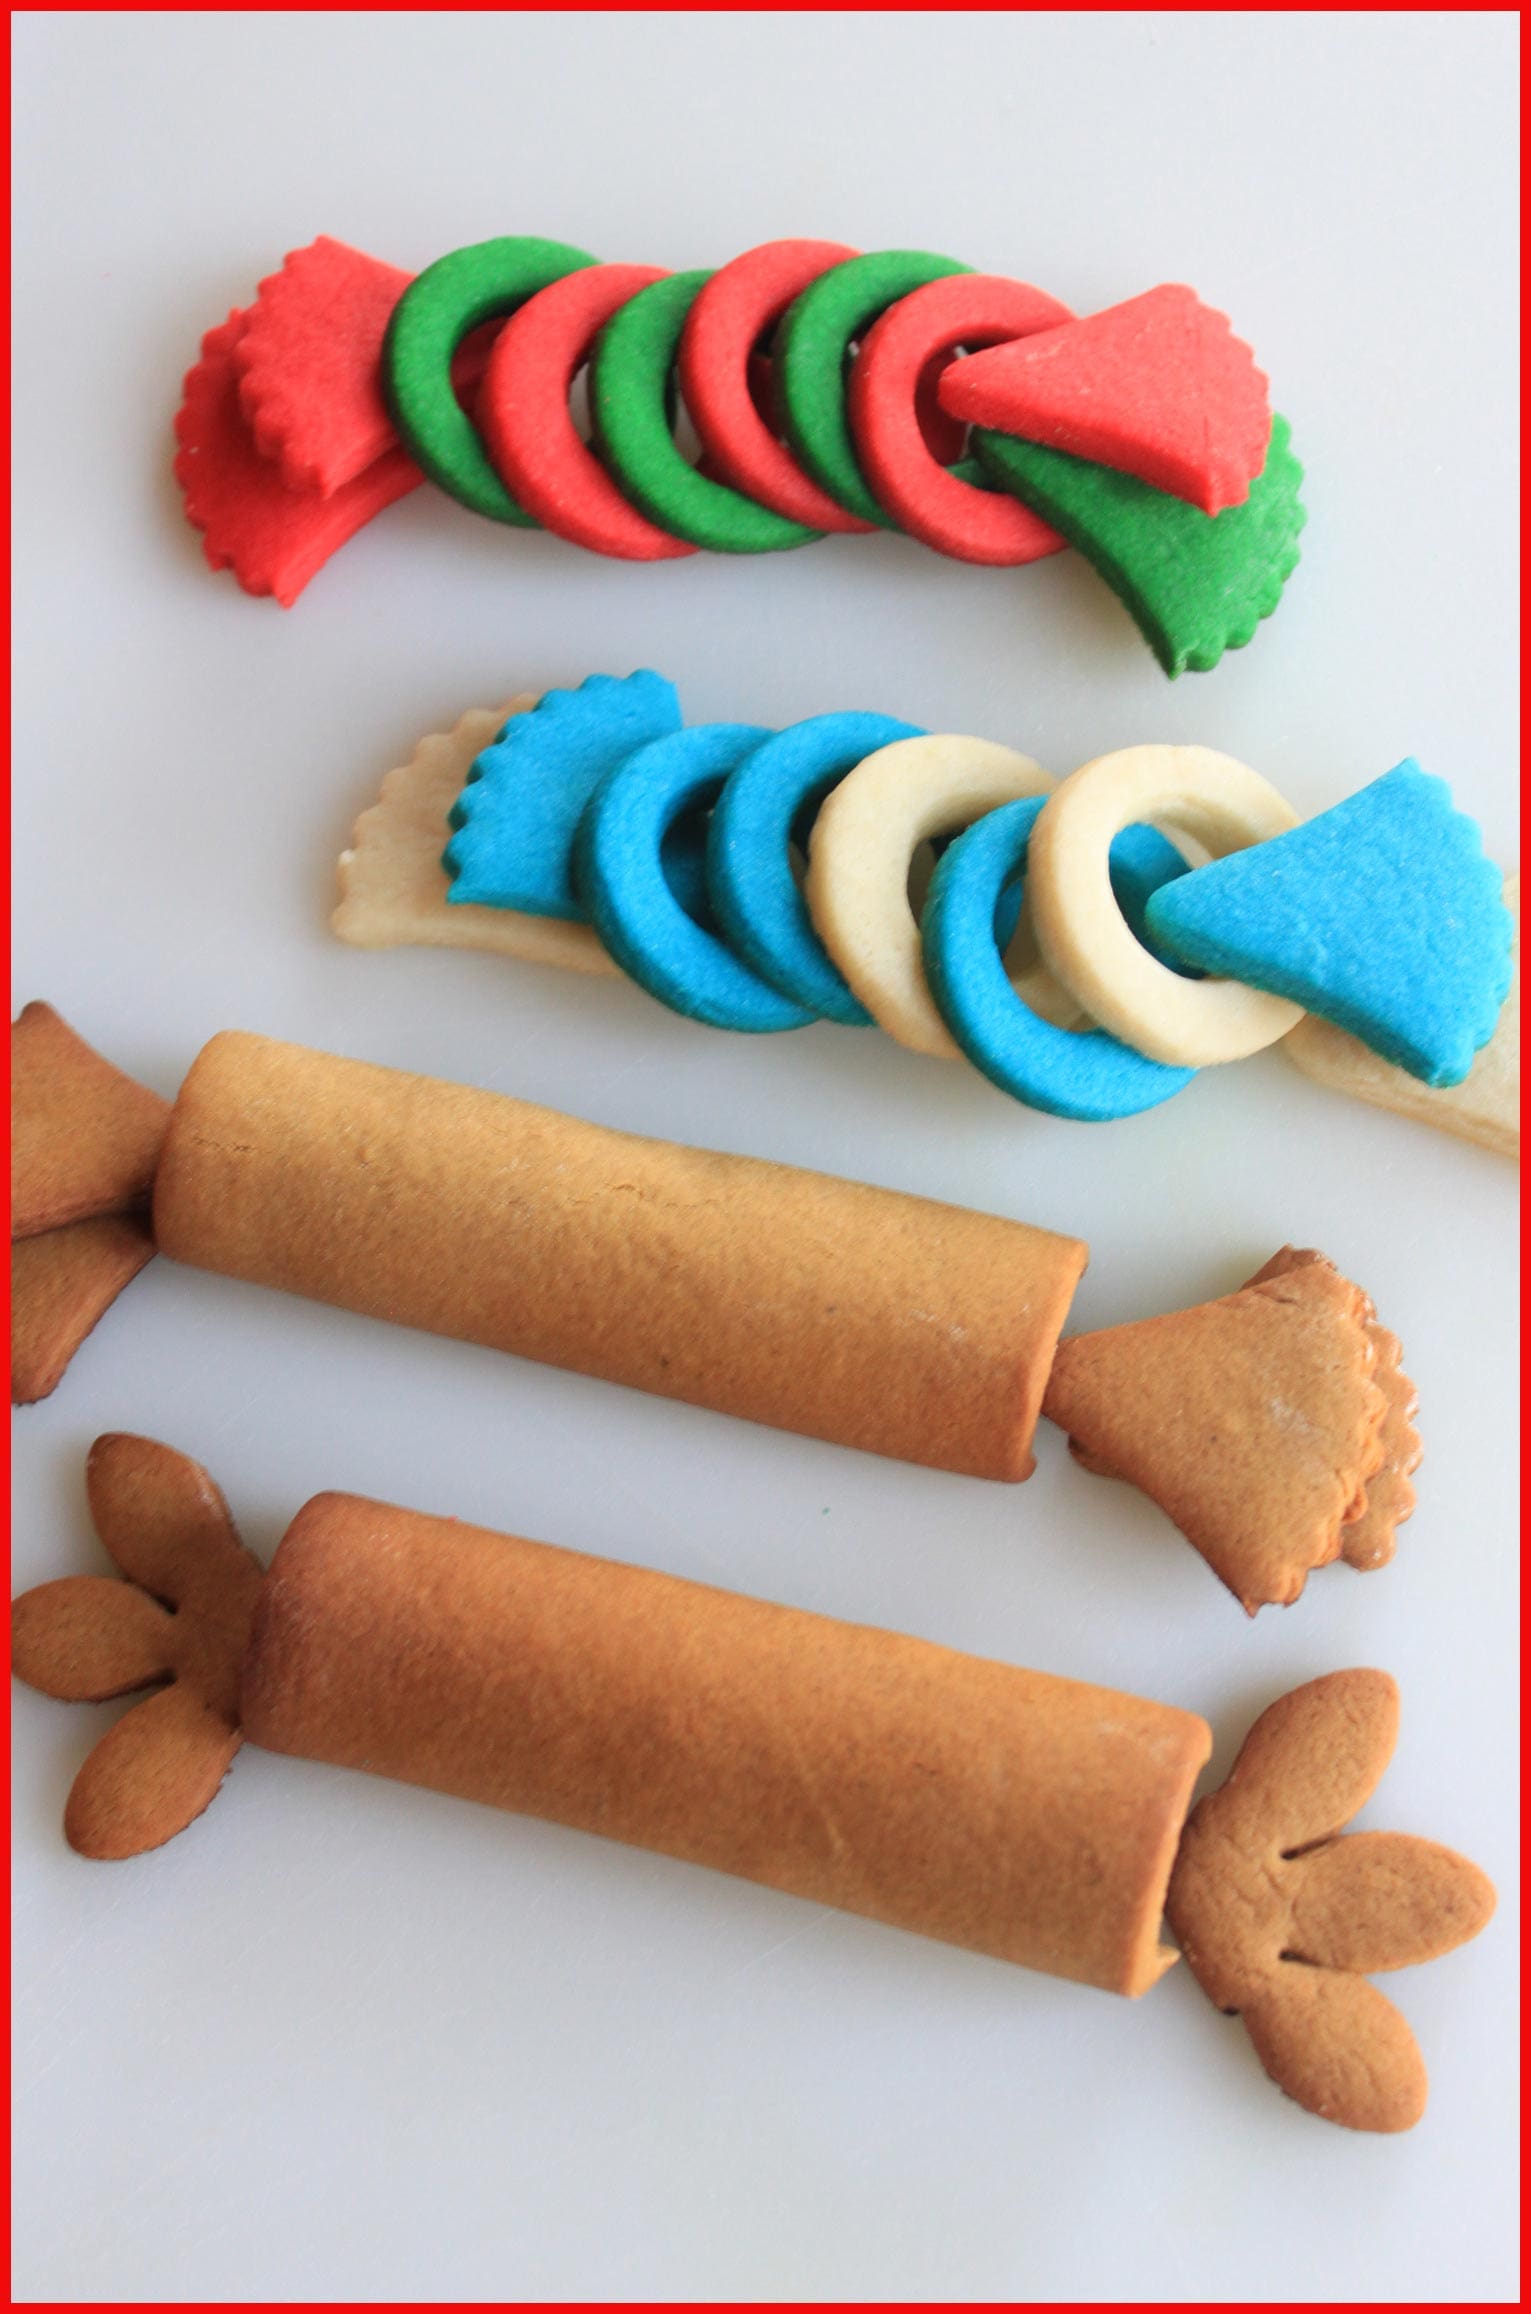
For O-ring crackers: Tint portions of the sugar cookie dough as desired, by either kneading in the food coloring or blending it in using an electric mixer fitted with a paddle attachment. Proceed to cut out about 6 O-rings in an assortment of colors. I used a 1 5/8-inch diameter cutter to cut the outside dimension and then a 7/8-inch cutter to make the opening in the center. Just remember, it’s best to cut out these particular cookie shapes directly on either parchment paper liners or silicone baking mats, rather than transfer them from your work surface. This way, you’ll avoid distorting the shapes during transfer, and ensure that all the pieces line up nicely in the end. For a view of the cutters used, see the second photo to the right. Bake as directed and cool completely before decorating.
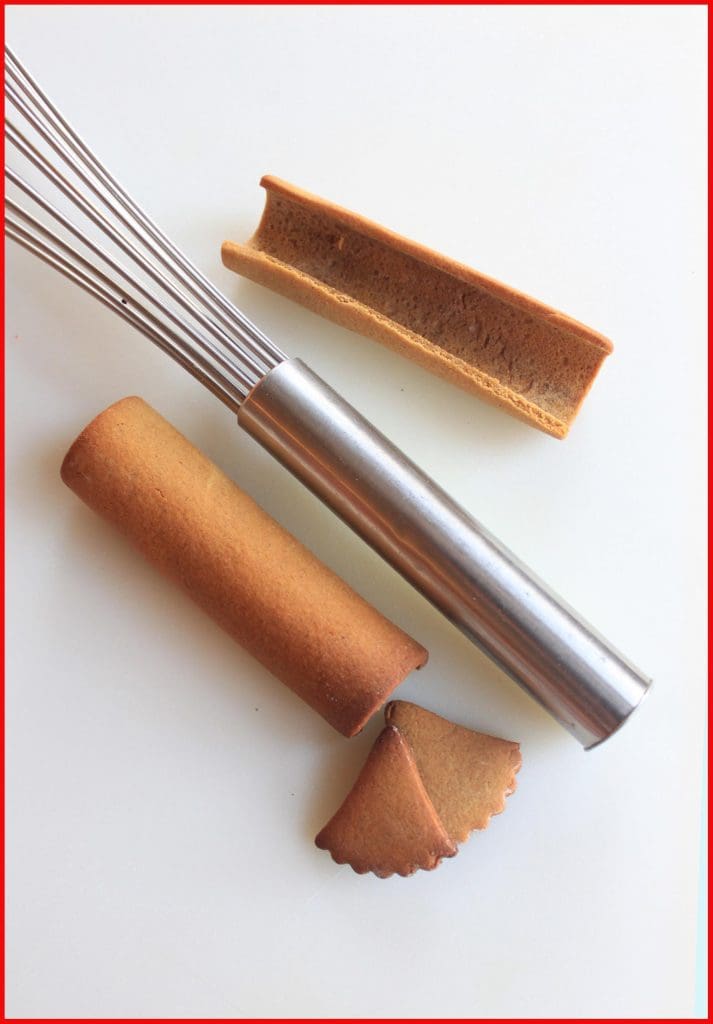
For half-cylinder crackers: Tint your chosen dough as indicated for O-ring crackers. It’s best to form two half-cylinders per cookie rather than a single cylinder, as it’s easier to remove the dough from the tool you’ve used to shape it if the dough doesn’t completely encircle the tool. To make the half-cylinder, simply cut a 2 x 4 1/4-inch rectangle (or thereabouts) out of the dough and carefully wrap it around the handle of an all-metal kitchen tool. I used a whisk (third photo) with a 1-inch diameter handle. Place the tool on a cookie sheet and bake the dough as directed. When the cookie is still hot from the oven, trim the edges (to straighten) with a small paring knife, with the dough still on the handle. Trimming will ensure a better fit of the two half-cylinders in the end. Let the half-cylinder cool slightly until it holds its shape without the support of the handle, and gently slip it off the handle to cool completely. (This step may take a little trial and error, so be sure to have extra dough on hand.)

If the dough should expand and crack upon baking, knead in a bit more flour and try again. A slightly stiffer dough generally leads to less cracking of wrapped shapes. For a short-cut, make only one half-cylinder per cracker, but recognize that you won’t be able to fill single half-cylinder crackers later. They’ll still look pretty though with their one decorated side facing up! For more dough-wrapping details, click here.
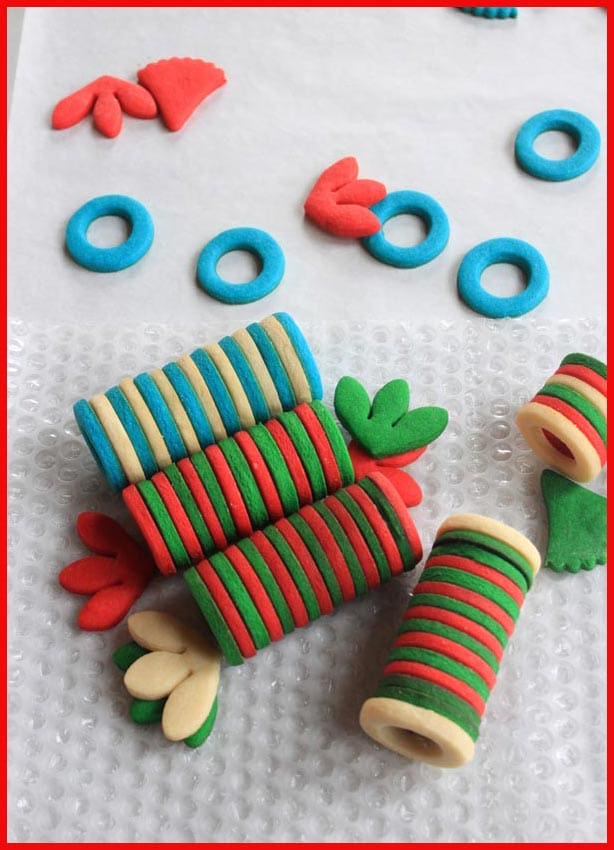
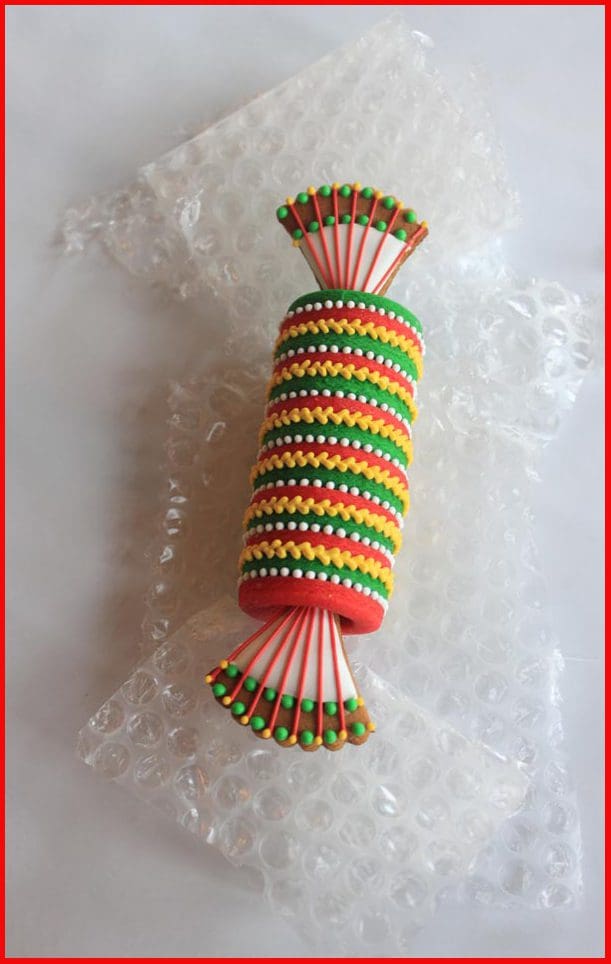
For the fan-shaped end pieces: Tint your chosen dough as indicated for O-ring crackers, and then roll and cut it into fan-shaped pieces of the size indicated above. You can do all the cutting by hand using a paring knife, but I wanted more intricate edges, so I first cut out fluted rounds and daisy shapes with larger cutters (second photo) and then cut those pieces down to size with a paring knife. Again, bake as directed and cool completely before decorating.
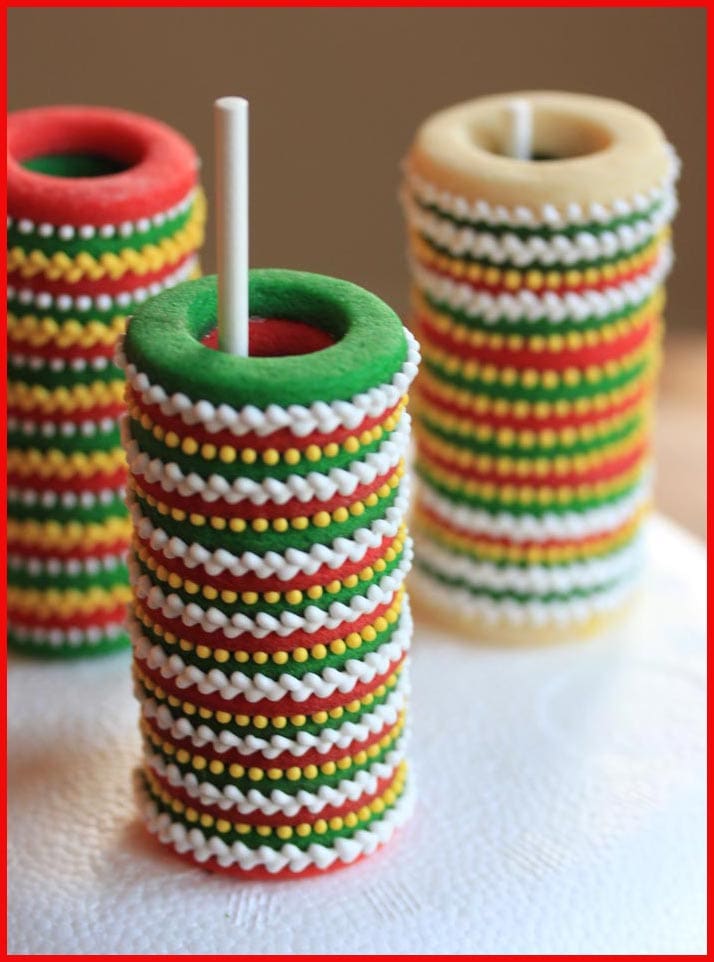
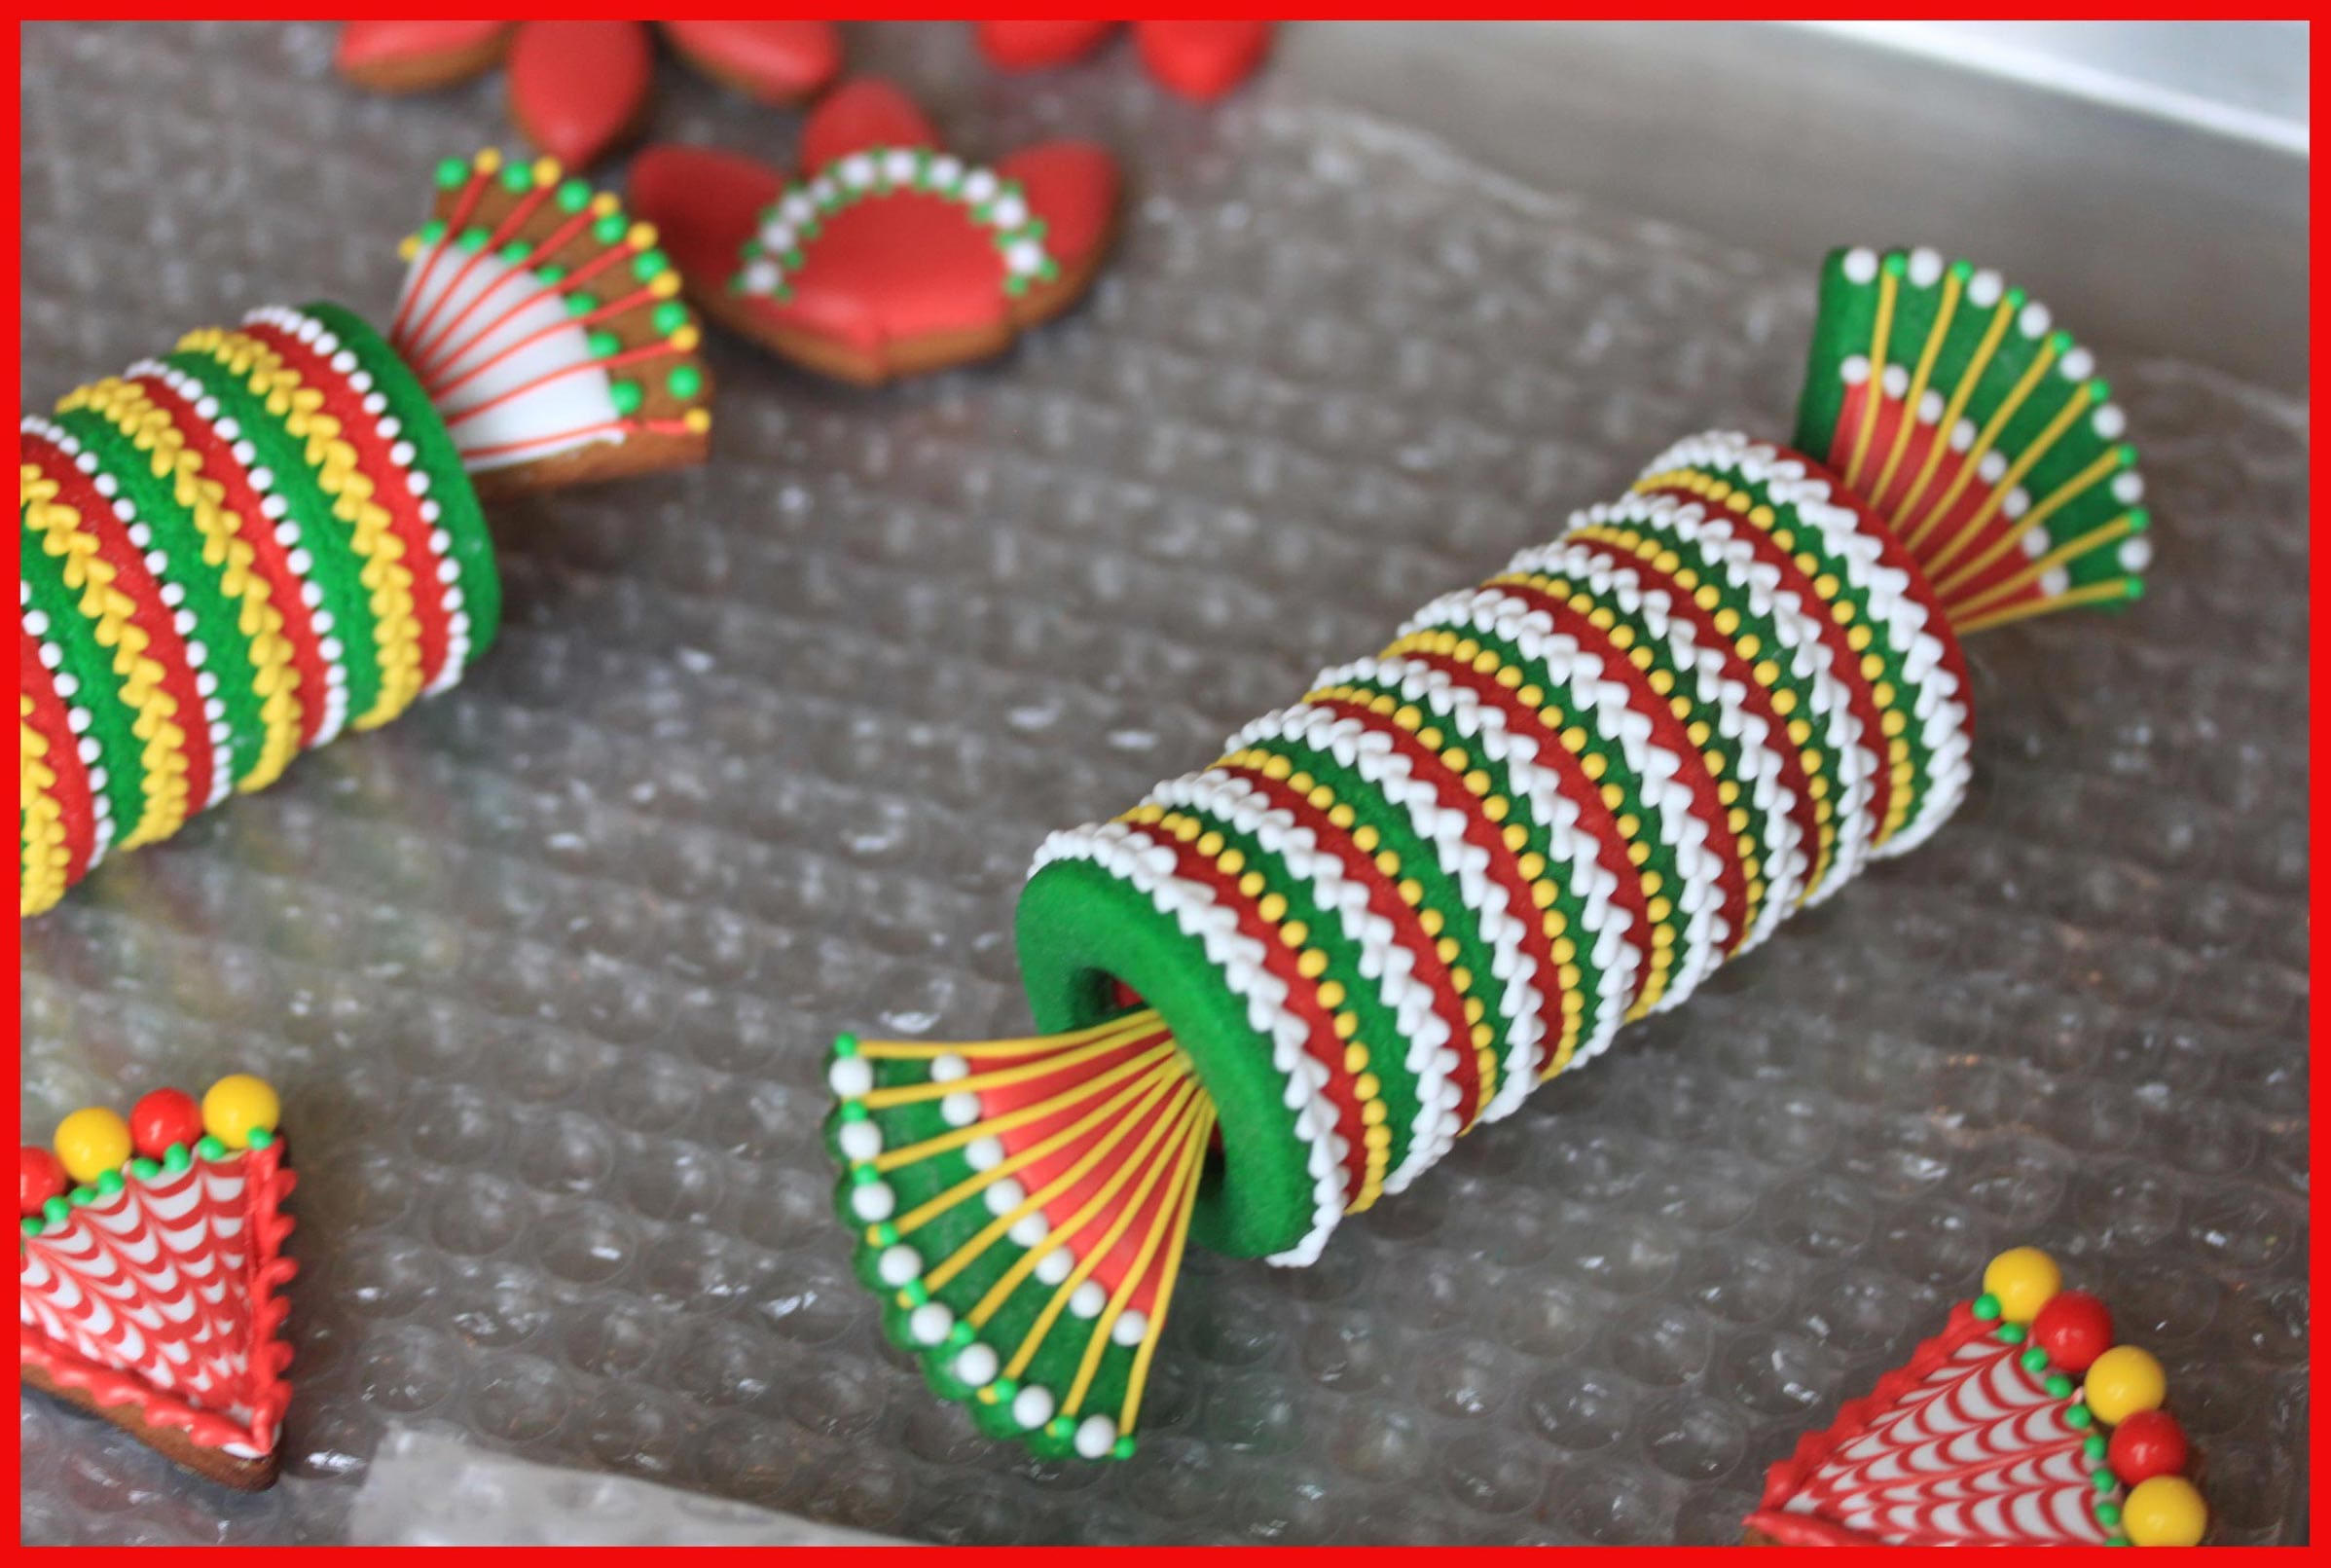
2 | Assemble the tube(s). Use the thick Royal Icing to glue together 6 O-rings (or 2 half-cylinders along their long sides*). Set the tubes on bubble wrap to keep them from rolling around too much (fifth photo), and let the icing dry completely before decorating further in the next step.
*Though for needlepoint work (such as on the second tube from top right, first photo), it’s best to decorate each half-cylinder while on its side before gluing the pieces together.
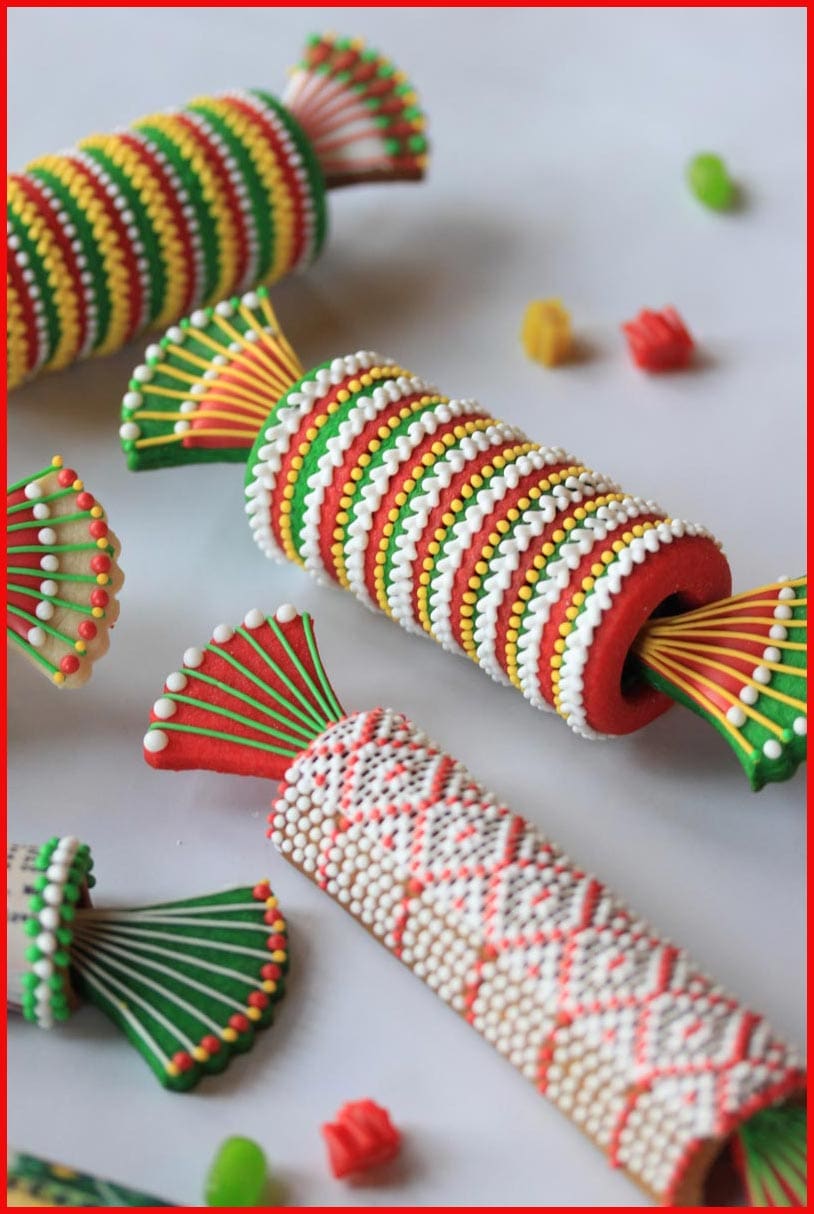
3 | Decorate the tube(s) and fan-shaped pieces. The tubes can be decorated any which way, so feel free to get creative! I chose to pipe Royal Icing beadwork and other details on the O-ring tubes, and to wrap some of the half-cylinder tubes with pre-printed frosting sheets. If you choose to pipe the sides with simple dots and lines, it’s far easier to do so with the tubes standing straight up so you can work around the entire cylinder without waiting for the icing on any one side to dry. To prevent the tubes from falling over while you work, insert lollipop sticks (or dowel rods) into a styrofoam form and then slip the tubes over the stick (sixth photo).

If you’d like to wrap the half-cylinder tubes with frosting sheets, simply cut a sheet to fit all the way around the tube; use a small sponge brush to schmear a thin layer of corn syrup onto the back of the frosting sheet; and wrap the sheet, corn syrup-schmeared side down, around the tube. For more tips on working with frosting sheets, read my wafer-papering tutorial. While these two types of edible papers handle basically the same way, I prefer frosting sheets for this project because they are thicker and less see-through.
Use any leftover icing to add details to the fan-shaped pieces. I stuck to simple dots and lines, because my tubes were already pretty jazzy!
4 | Finish the cracker assembly! Once you’ve decorated the tube(s) and fan-shaped pieces as you wish, and the icing on them has completely dried, carefully fill the tubes with your message and small candies. Then use the leftover thick icing “glue” to fix the the fan-shaped pieces just inside the ends of the tube, so they close up the holes. Again, it’s easiest to work on bubble wrap to keep the tubes from moving as you work. You’ll also want to use a bit of bubble wrap (or crumpled paper towel) to prop the fan-shaped pieces in place until the “glue” has completely dried (seventh photo). Carefully transfer the crackers to a serving platter or individual dishes when they’re ready to present!
For more piping and wafer-papering tips, be sure to check out my new video series, available on DVD either here or in the link under “Also See,” below.