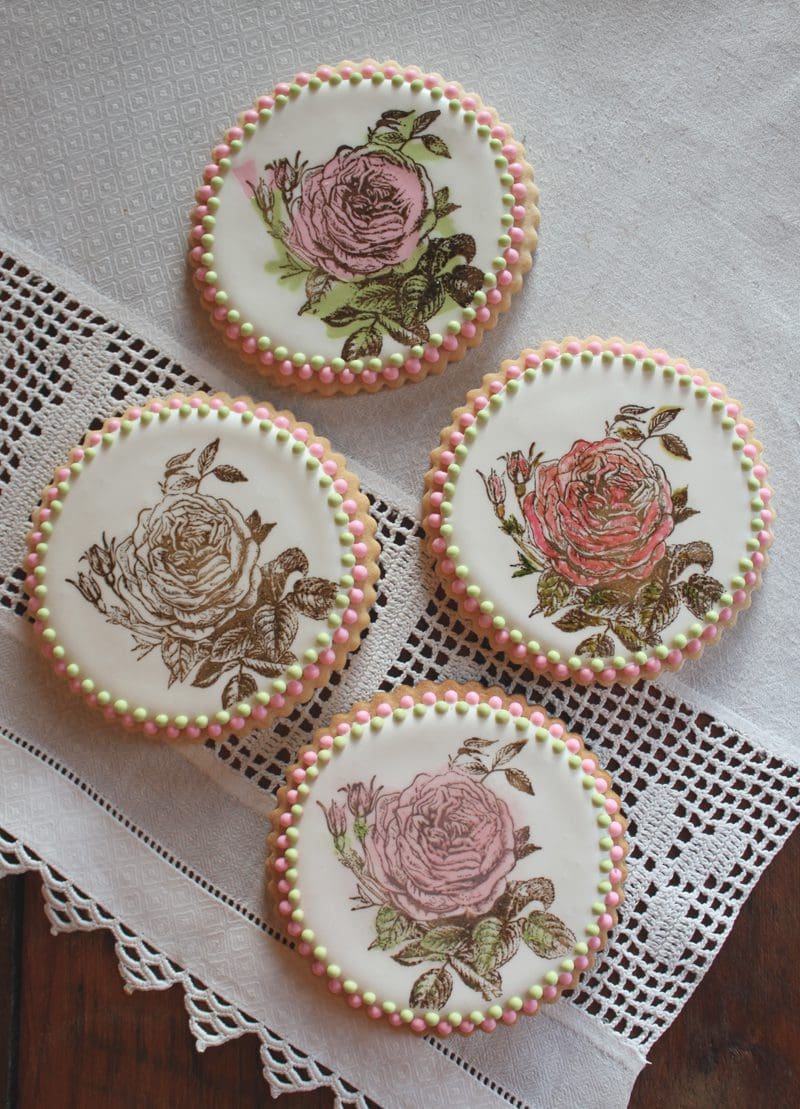

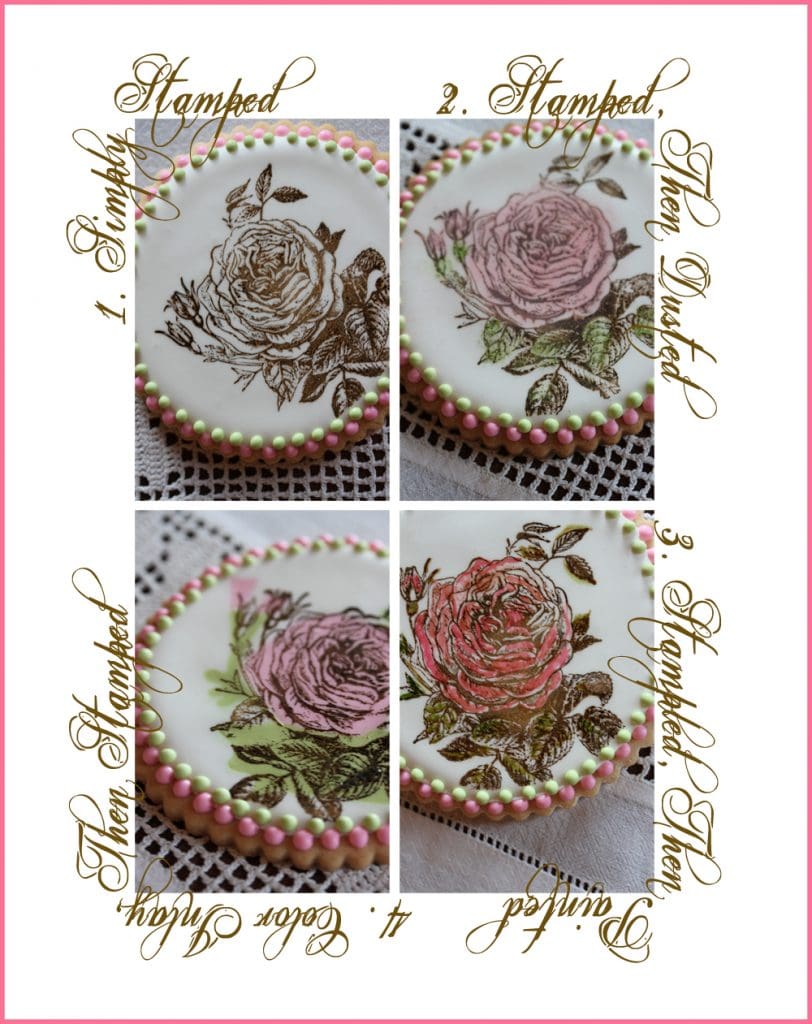
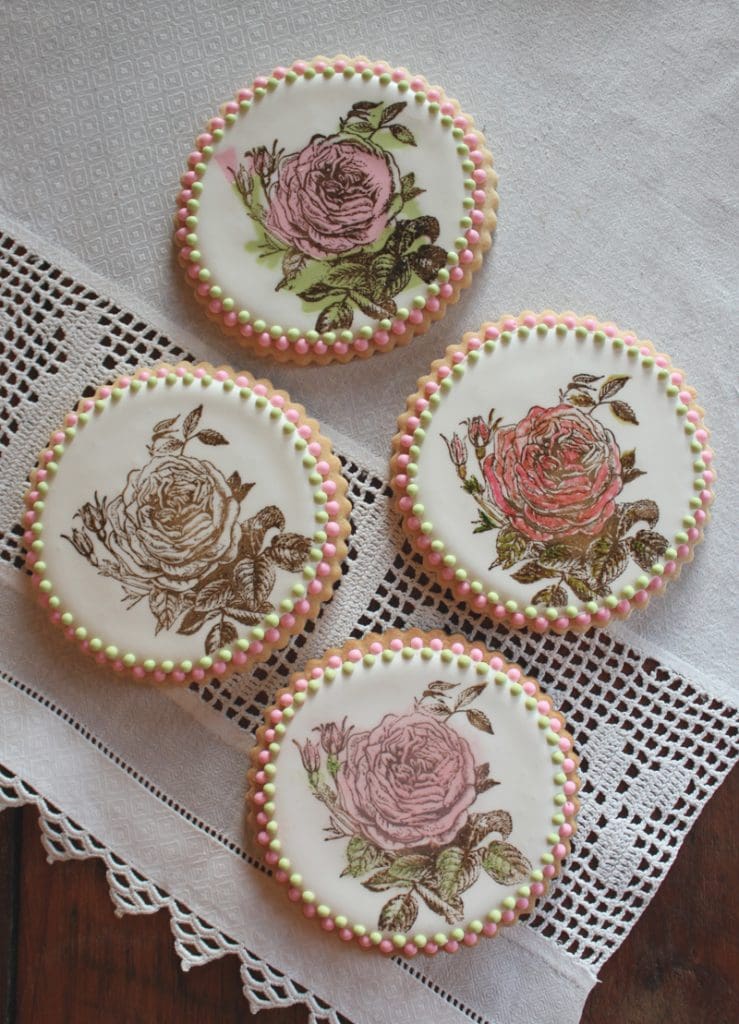
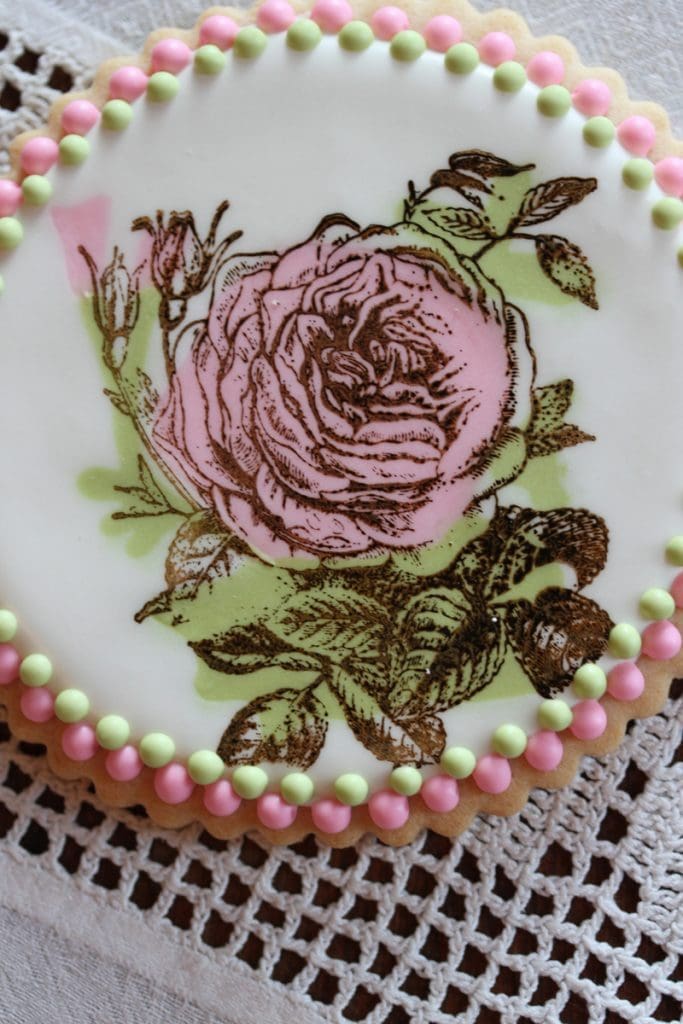
While prepping for my recent video shoot, I became fascinated with these simple rose cookies and how amazingly different the same stamped cookie could look with only slight variations in other decorative treatments. The effects range from sharp and clean to soft and romantic, all achieved with quick, easy twists. My fave, the color inlay effect (variation #4), is the least obvious of the lot, so I give it extra special attention in the tutorial that follows.
Brief pause for shameless self-promotion: About those videos I just mentioned . . . all 16 released last November; each covers in detail a decorating technique from my book Ultimate Cookies; and all can be accessed through my online store. I hope you’ll check them out!
What you’ll need for a few cookies:
To make:
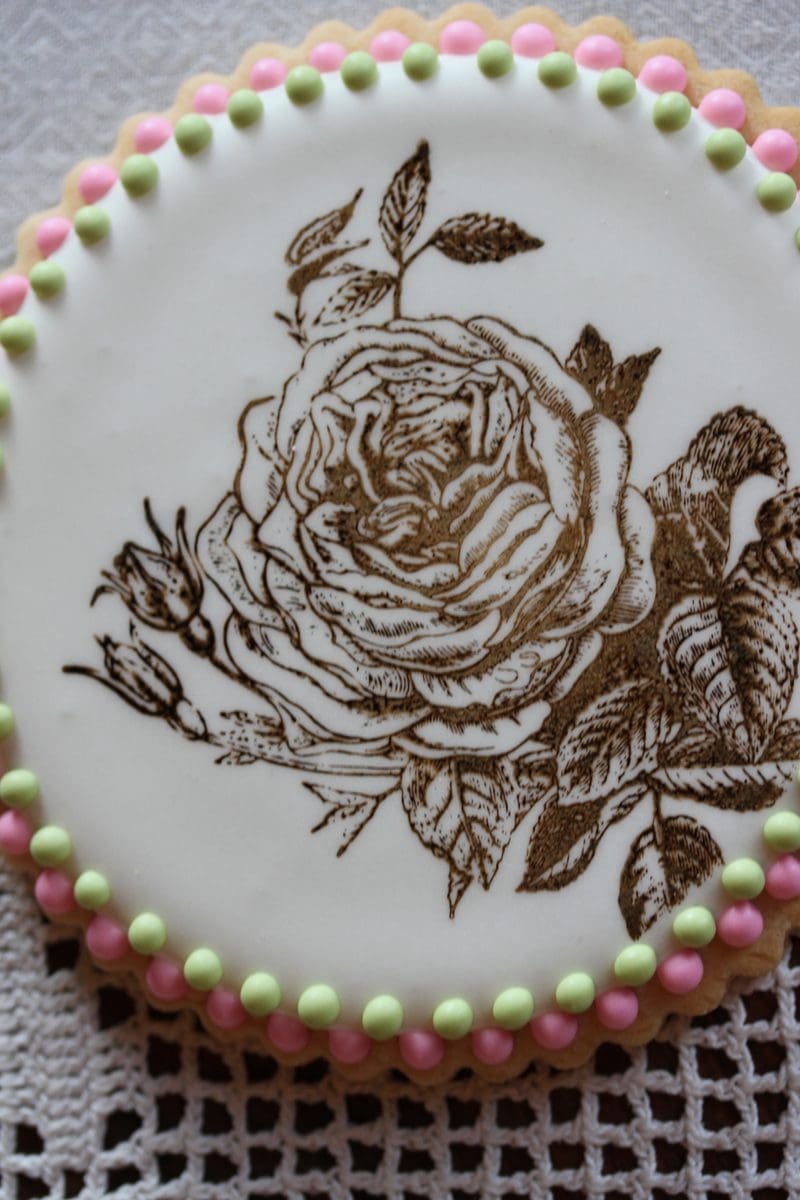
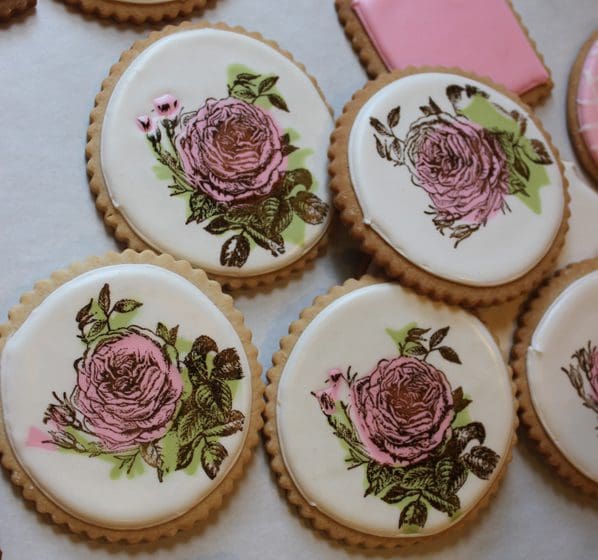
1 | Simply Stamped. This variation (third photo from top) is the most straightforward of the bunch: it starts with topcoating (preferably in a light color) and ends with a quick rubber-stamp. After you’ve smoothly topcoated your cookies with Royal Icing, let them air-dry until the icing has dried all the way through. I allow the cookies to sit uncovered at room temperature overnight, sometimes longer if it’s particularly humid. The icing will have crusted and dulled to a matte finish a lot sooner, but don’t let these looks fool you into thinking you can quickly move forward. It’s crucial not to rush the drying time or you will crack the underlying icing when you apply pressure to the cookie top while stamping as I’m about to describe. (You can accelerate the drying time by placing the cookies in a dehydrator or low, meaning about 150˚F, oven. But watch the cookies carefully, as the icing can crack; the added heat can also have a drying effect on the cookies.)
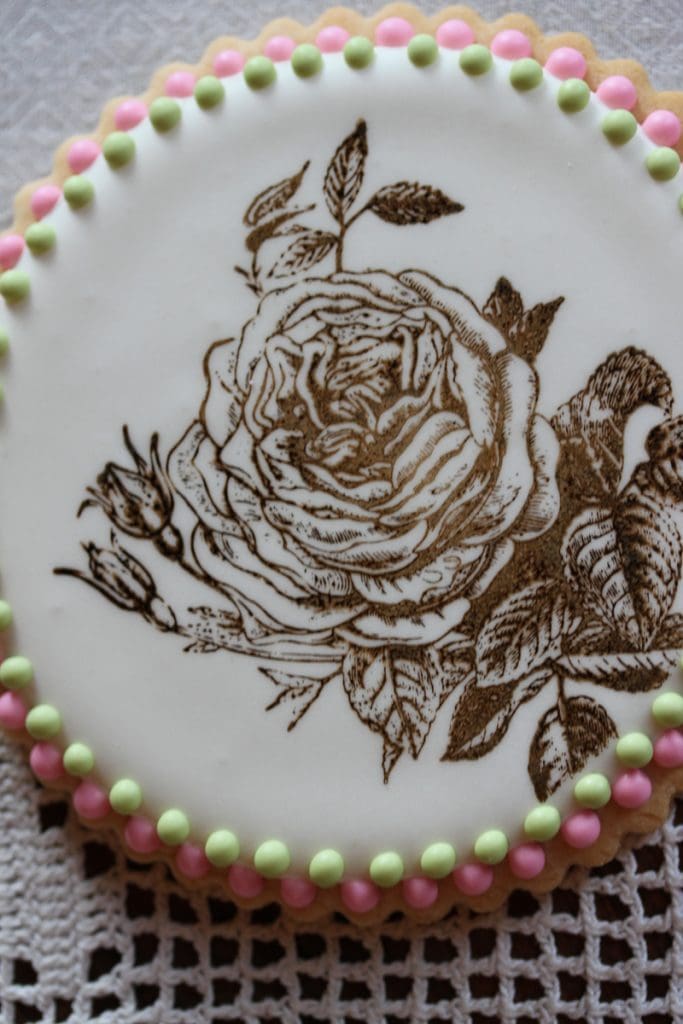
As for stamping, I give detailed blow-by-blow instructions here, so suffice it to say: for best results, (1) choose a stamp that fits your cookie topcoats with some room (about 1/4 inch) to spare around the edges; (2) ink the stamp with food coloring (I used Chefmaster Buckeye Brown here) using either an ink pad or paper towels to distribute the coloring; and (3) press the stamp firmly (more firmly than you might think) on the icing top. Press extra firmly in the center of the cookie, where there is most likely to be a divot, to ensure that the stamp makes even contact with the icing. Be careful not to roll or rock the stamp, or you will most certainly end up with a more blurry transfer. You may want to test your stamp on a piece of paper first to get a handle on how well it takes to the food coloring (some clear plastic, self-mounting stamps seem to repel it) and how much coloring you need to apply for even coverage.
If you find that despite your best efforts, you get an incomplete transfer of coloring, no worries! “Connect the dots” with a food-safe marking pen in the same color or by painting on food coloring with a small craft paintbrush.
It’s best to allow the food coloring to dry completely before applying additional treatments on top, as in Variations #2 and #3, below. Otherwise, it’s easy to smudge the stamp. Drying time will vary with the quantity of coloring on the stamp and ambient conditions. If the stamp wasn’t over-inked, most stamps inked with soft-gel coloring dry to a light touch within a half hour – and drying time can always be accelerated with a heat gun if you’re in a rush. Some say airbrush food coloring dries faster, though I haven’t tested it on stamps. But, then again, I don’t find the dry time of soft-gel coloring at all excessive . . . so when I can avoid purchasing another type of food coloring, I will!
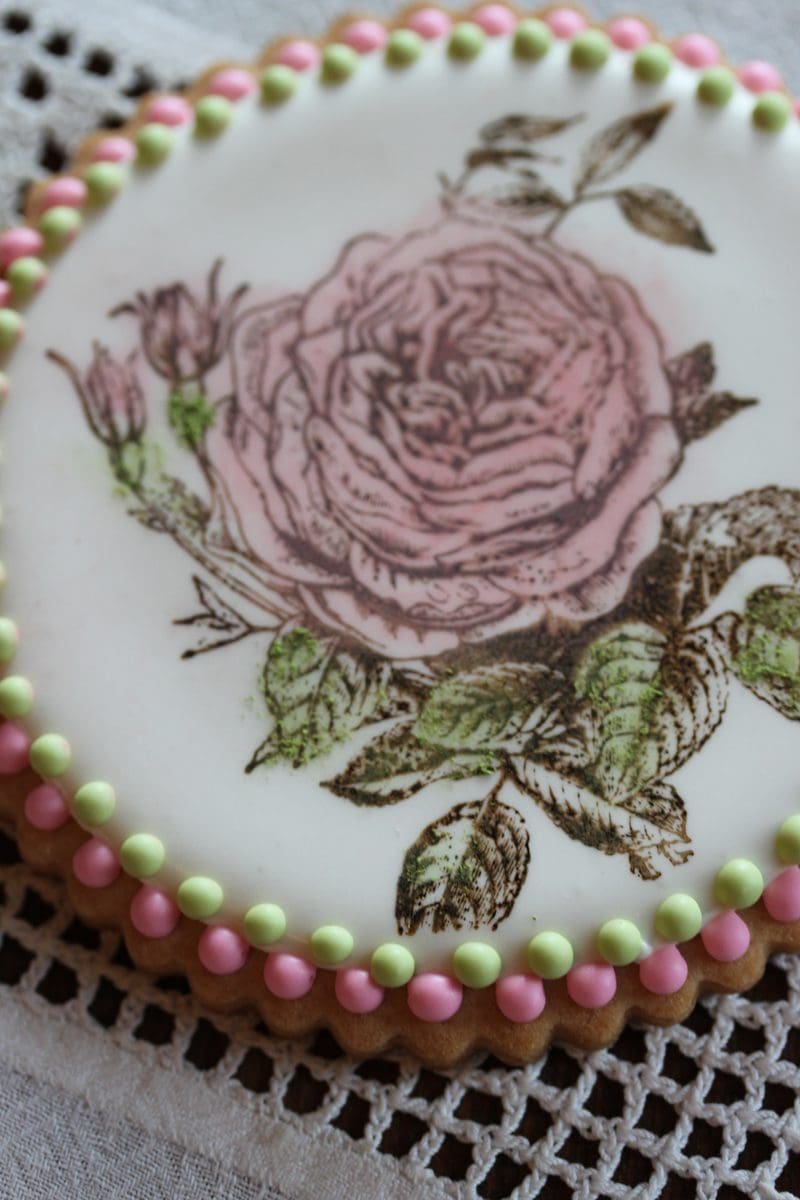
2 | Stamped Then Dusted. An easy extension of “Simply Stamped,” this variation (fourth photo from top) involves the application of subtle color to a dry stamped cookie using fine-grained petal or luster (aka shimmer) dust. Here, I’ve used a clean, small and, most importantly, dry craft paintbrush to dust the rose with pink petal dust and the leaves with green petal dust. A little dust will go a long way and it’s somewhat a hassle to get excess dust off cookies, so simply dip your brush in the dust, tap the brush on the side of the container to remove any excess, and then gently swipe your brush over the areas you want to color. (I also often test the dust on an extra cookie first, as shown in the fifth photo, to get a better sense of its color and coverage. Each brand and type of dust behaves slightly differently.)
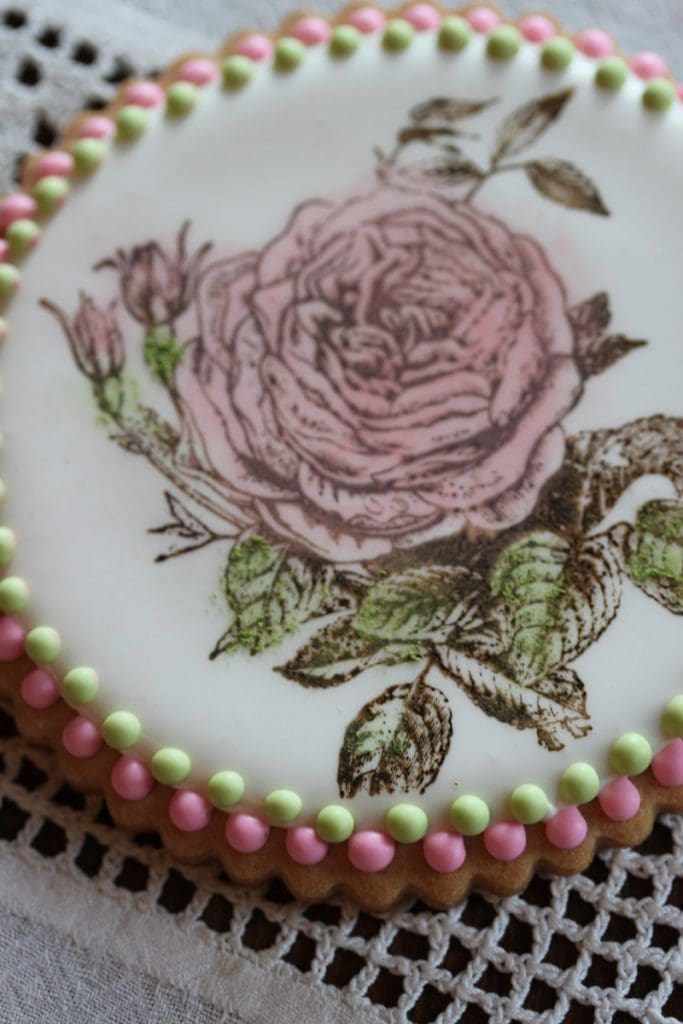
You’ll likely see a little excess dust on the cookie regardless of how sparingly you use it. You can brush it off, though so doing often just shifts the dust into areas where color isn’t wanted. Usually, the best approach is to give the cookie a quick tap on its side, or a blast with a heat gun or blow drier to remove the dust in one clean fell swoop. Dusting will also tend to soften the crisp lines of the original stamp. If you don’t like this effect, you may be better off with the color inlay approach in Variation #4, below.

Note: Both petal and luster dust come in a broad range of colors, many identical to one another (within the same brand). The difference is that luster dust is more iridescent than petal dust, so it will leave dusted areas with more sheen. Sheen is neither a good thing nor a bad thing, but rather a matter of personal preference – so choose your dust wisely! And test on an extra cookie when in doubt.
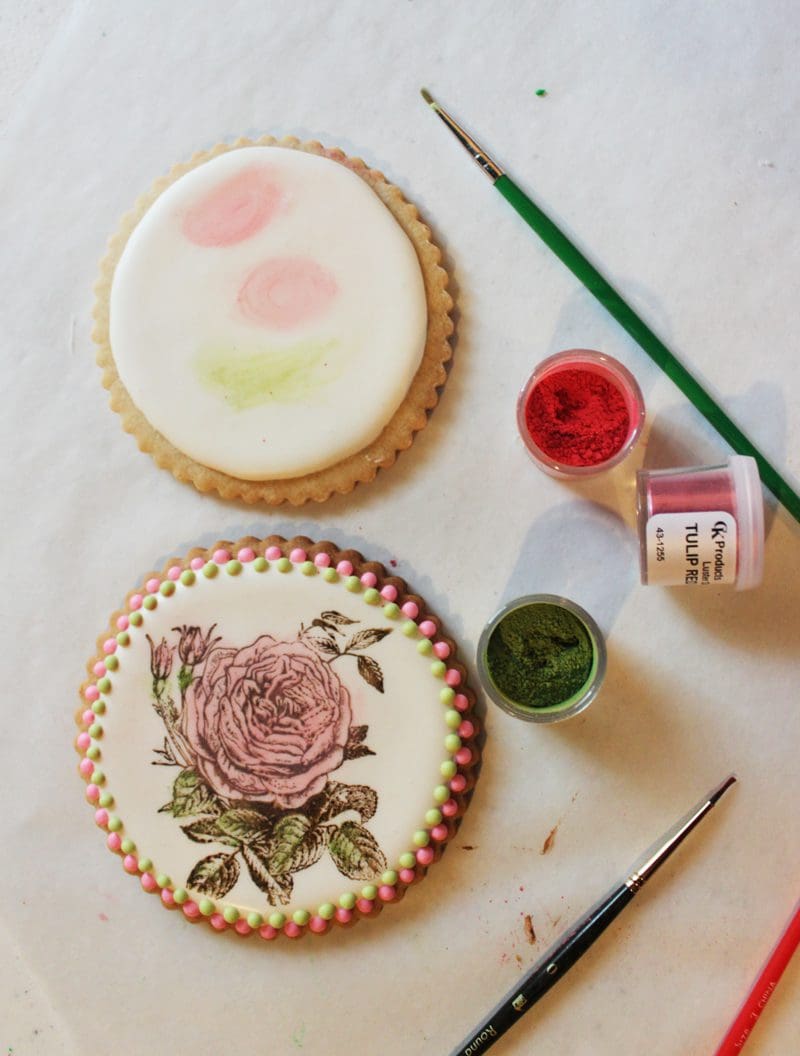
3 | Stamped Then Painted. Another easy extension of “Simply Stamped,” this variation (sixth photo from top) involves the painting of soft-gel food coloring or extended petal or luster dusts onto a dry stamped cookie. The end result is added color, but with more oomph than what you get with dusting. To paint with food coloring, simply choose a brush sized to fit the details on your cookie and go! (I worked with a 10/0 spotter and liner to fill the tiny openings in this stamp.) You can thin the coloring with a little extract or alcohol if you want a more translucent paint, but oftentimes I simply dampen my brush a little (or even use a dry brush), so that the paint is less flow-y and I have more control.

Note: Some people thin coloring with water, which works, but I find that alcohol or alcohol-based thinners, like extract, dry faster. Even so, most soft-gel food coloring “paint” will dry with some sheen. If you prefer a more matte finish, I recommend painting with extended petal dust. Generally a ratio of one part extract to one part dust makes a reasonably opaque and easy-to-control paint.
With either paint, avoid painting on the stamped imprint; that is, if you want that imprint to remain sharp and the painted colors to remain true to their original hue. Even if the stamp color has dried to the touch, once it engages with wet paint, it will bleed into that color. In the case of my cookie pictured right, I definitely did not stay within the lines. As you can see, the pink I applied ended up closer to red due to mixing with the brown stamp.
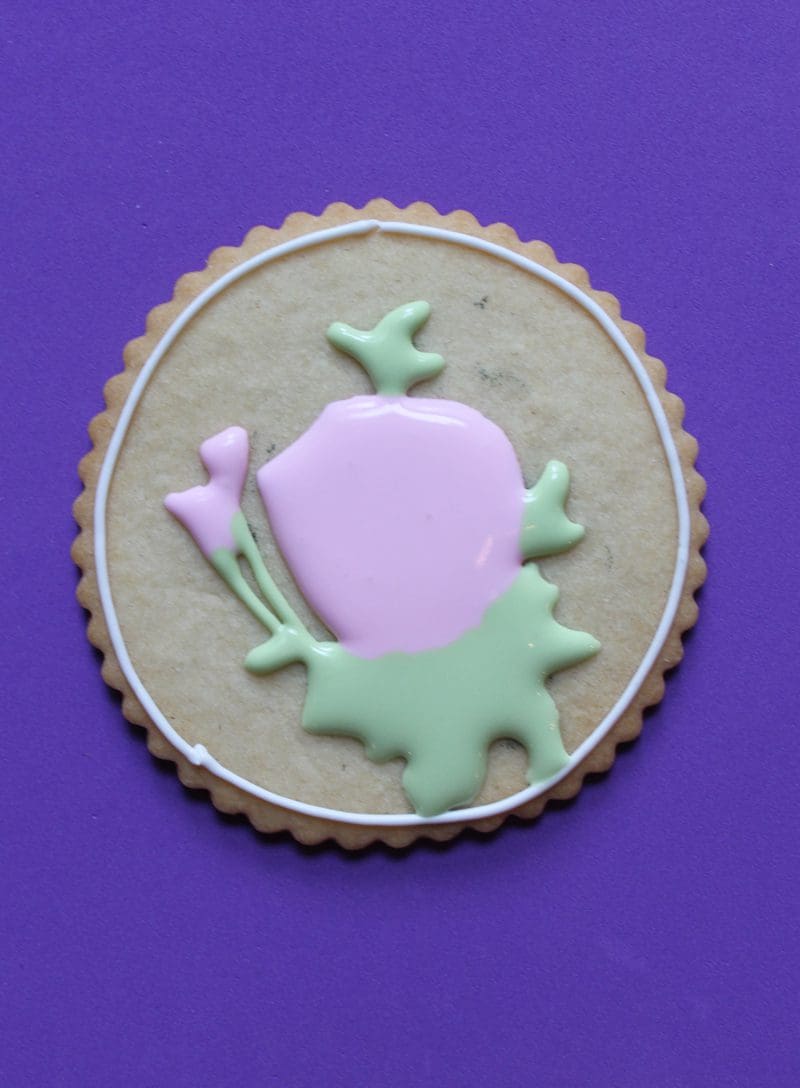
4 | My Fave: Color Inlay Then Stamped. Because I like my stamps to remain clean and crisp, this variation (seventh photo from top) is my preferred method for adding color to stamped cookies, even though it is a bit more time consuming. Basically, I start with a naked cookie and apply background colors to the cookie before stamping. You might be wondering how I know where to put the various colors so they end up behind the right things (i.e., green behind a leaf, and pink behind the roses and rose buds). Am I right? If so, read on and follow photos 8 to 12, which give a visual roadmap.
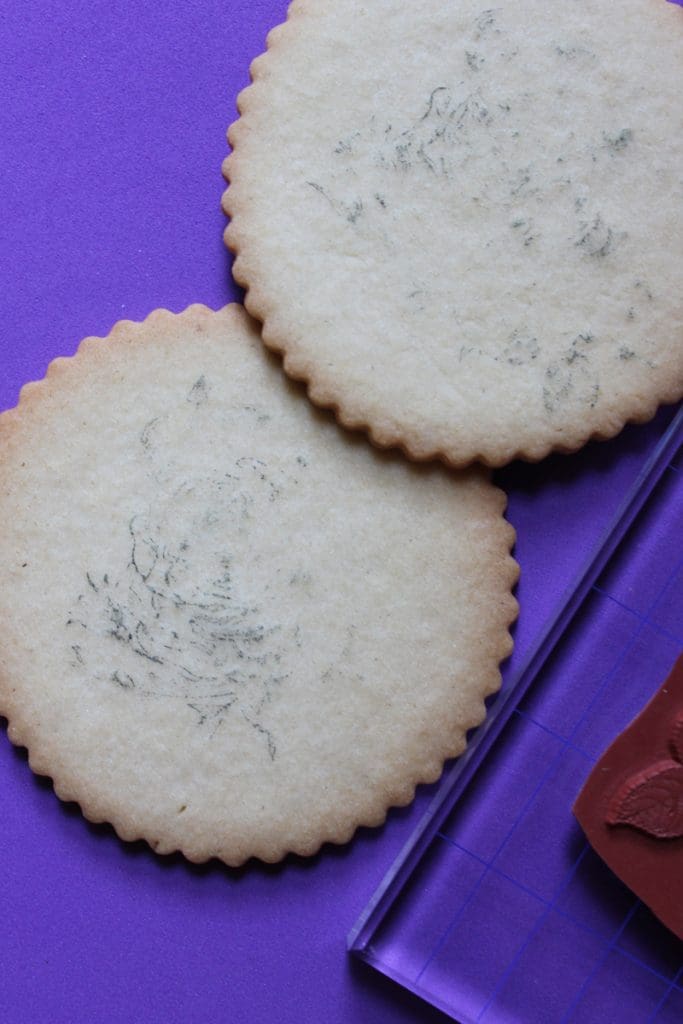

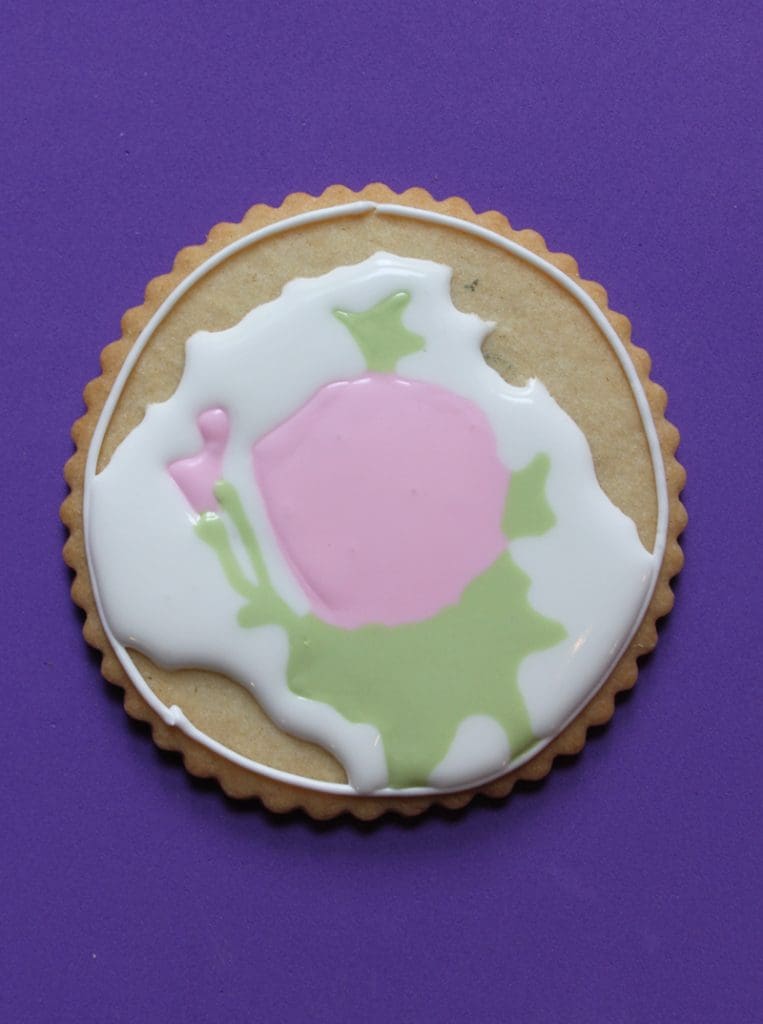
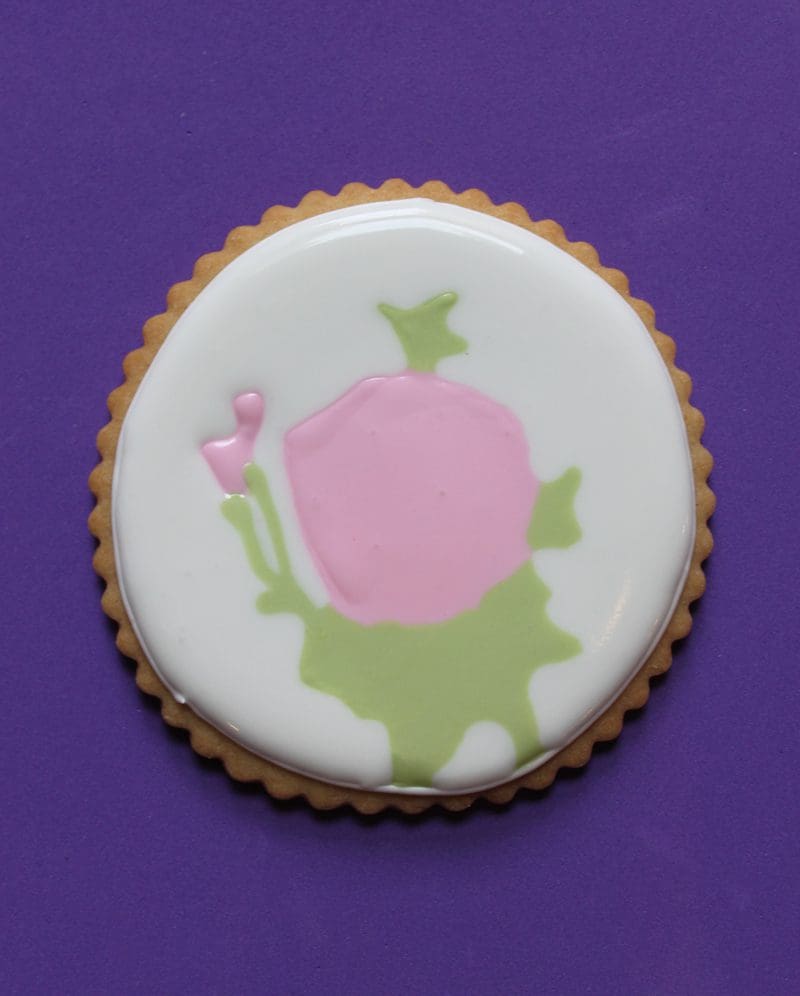
First, I stamp the naked cookie (photo 8). Admittedly, food coloring does not take well to naked cookies, but usually the stamp transfer is complete enough to serve as a rough guide for color placement. Next, mix the colors you want (in this case, white, pink, and green) to a loose topcoating consistency and pipe them into the appropriate areas defined by the stamp. I prefer to work fast so that all of the colors flow into one nice, smooth topcoat, but don’t worry if you get some drying and appearance of seams between the colors. (While the stamp is unlikely to hit any “valleys” in your icing, I’ve found that those small imperfections actually look appealing.) Flood the entire area; then let the icing dry all the way through (again, at least overnight unless you accelerate the process in the oven or a dehydrator). Then stamp as directed in Variation #1. If possible, use a stamp that self-adheres onto an acetate mount; you’ll be better able to line up the stamp with the colors on the cookie if you can see through the mount. But, again, don’t fret if the colors and stamp don’t match up perfectly. None of mine did (see photo 12), yet the effect can still be quite lovely!