
Ka-ching! Ka-ching! Not familiar with that sound? Well then, you’re as lucky as a kid in a candy shop, because most of us can recognize the sound of the cash register tallying up party damages from miles away.
There’s no denying: Throwing a party can burn a hole clear through your pocketbook by the time you add up the food and drink, not to mention the invitations, flowers, favors, and countless other party accoutrements. That’s why I’m always seeking ways for my party sweets, particularly cookies, to double as party décor. Cookies have a relatively long shelf life compared to cakes, so they’re ideal for dressing up and displaying beforehand, sampling throughout the party, and then handing out as keepsakes as guests leave.
Skeptical that a cookie can be eye candy, food, and favor all at the same time? Don’t be. Let me show you how I’ve taken cookies out of the box (and off their traditional plates) and made them the life of many a party . . .
Here I’ve assembled a collection of seasonal cookie projects, a retrospective of sorts from my books and various cookie-decorating dabblings, that I hope will provide inspiration – and save you money – when you’re designing your next party. For each project, I’ve provided tips and links to my related tutorials to help you replicate it or create your own personal riff. If I’ve left any stones unturned in my tips, please don’t hesitate to drop me a question in the comments area (Stir the Pot), below. So let’s get started, shall we?
I kick off with one of the more versatile projects, one that can be adapted to any time of year and to various purposes, as you’ll soon see . . .
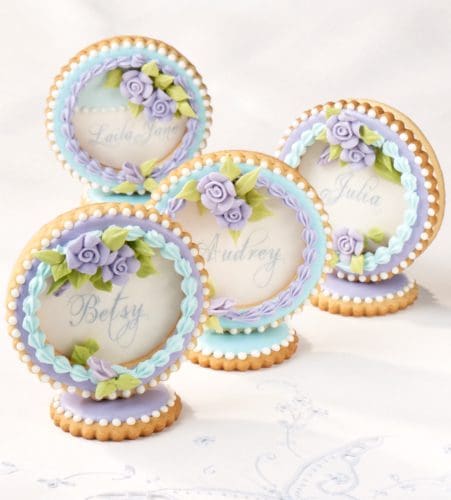
These simple but elegant place cards hark from my most recent book, Ultimate Cookies. Each consists of nothing more than an iced cookie backing, an iced cookie ring that is glued on top with thick Royal Icing, and an iced cookie pedestal. The trick to assembling this 3-D cookie is to cut the ring and backing to exactly the same size. When gluing them together, also be sure that the bottom edges of both backing and ring are flush. That way, the cookie round will be able to stand on its own with just a wee bit of icing “glue” to keep it fixed to the pedestal. I printed the names on wafer paper and applied them to the backing with a thin schmear of corn syrup, but you could easily pipe on the names instead. For more details about wafer papering, click here.

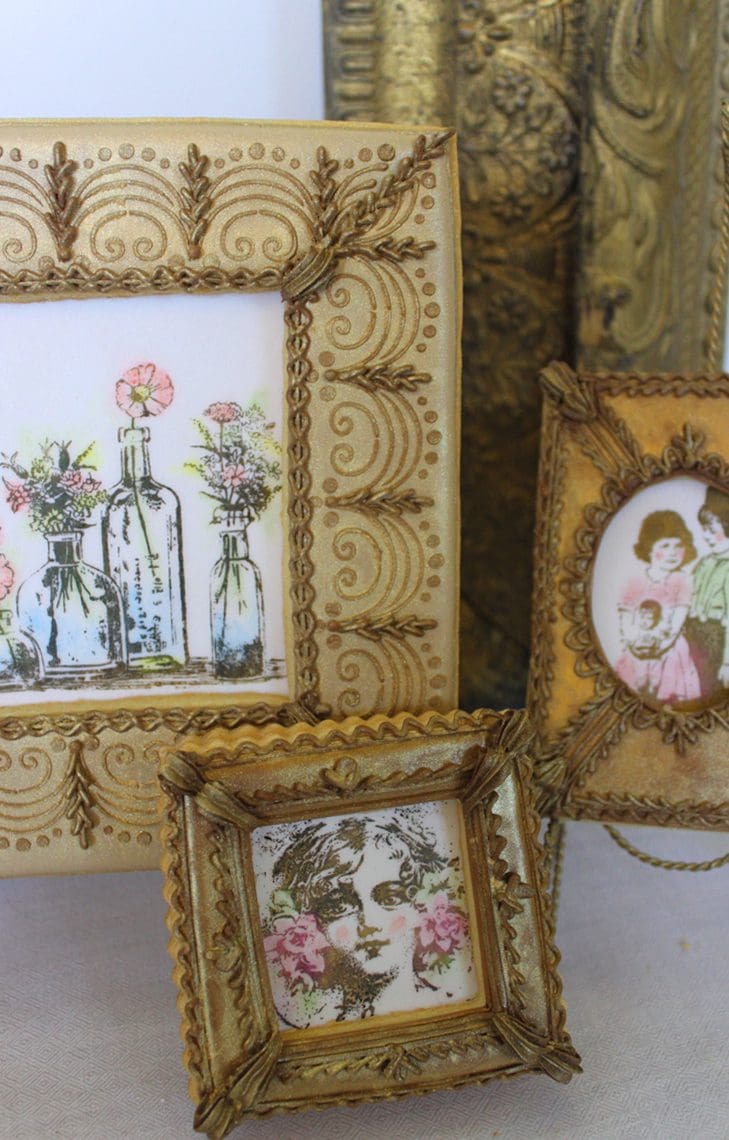
Yes, these pictures (second photo from top) are 100-percent cookie, from their canvases to their frames! A collection of pictures makes a wonderful edible centerpiece or focal point on a sweets table; smaller versions (like the portrait of the girl) can be individually bagged and tied for favors. And if you’re particularly artistic, you can customize the canvases with caricatures or paintings of your guests. So how do you make them? These cookies are actually constructed much the same way as the place cards, above, except that I used square, rectangular, and oval cutters to create the frames, rather than graduated round cutters for rings. And instead of printing the image for the backing on wafer paper, it was rubber-stamped onto each cookie after the topcoat had completely dried. Color accents were added by dusting on assorted luster and petal dusts with a dry craft paintbrush.

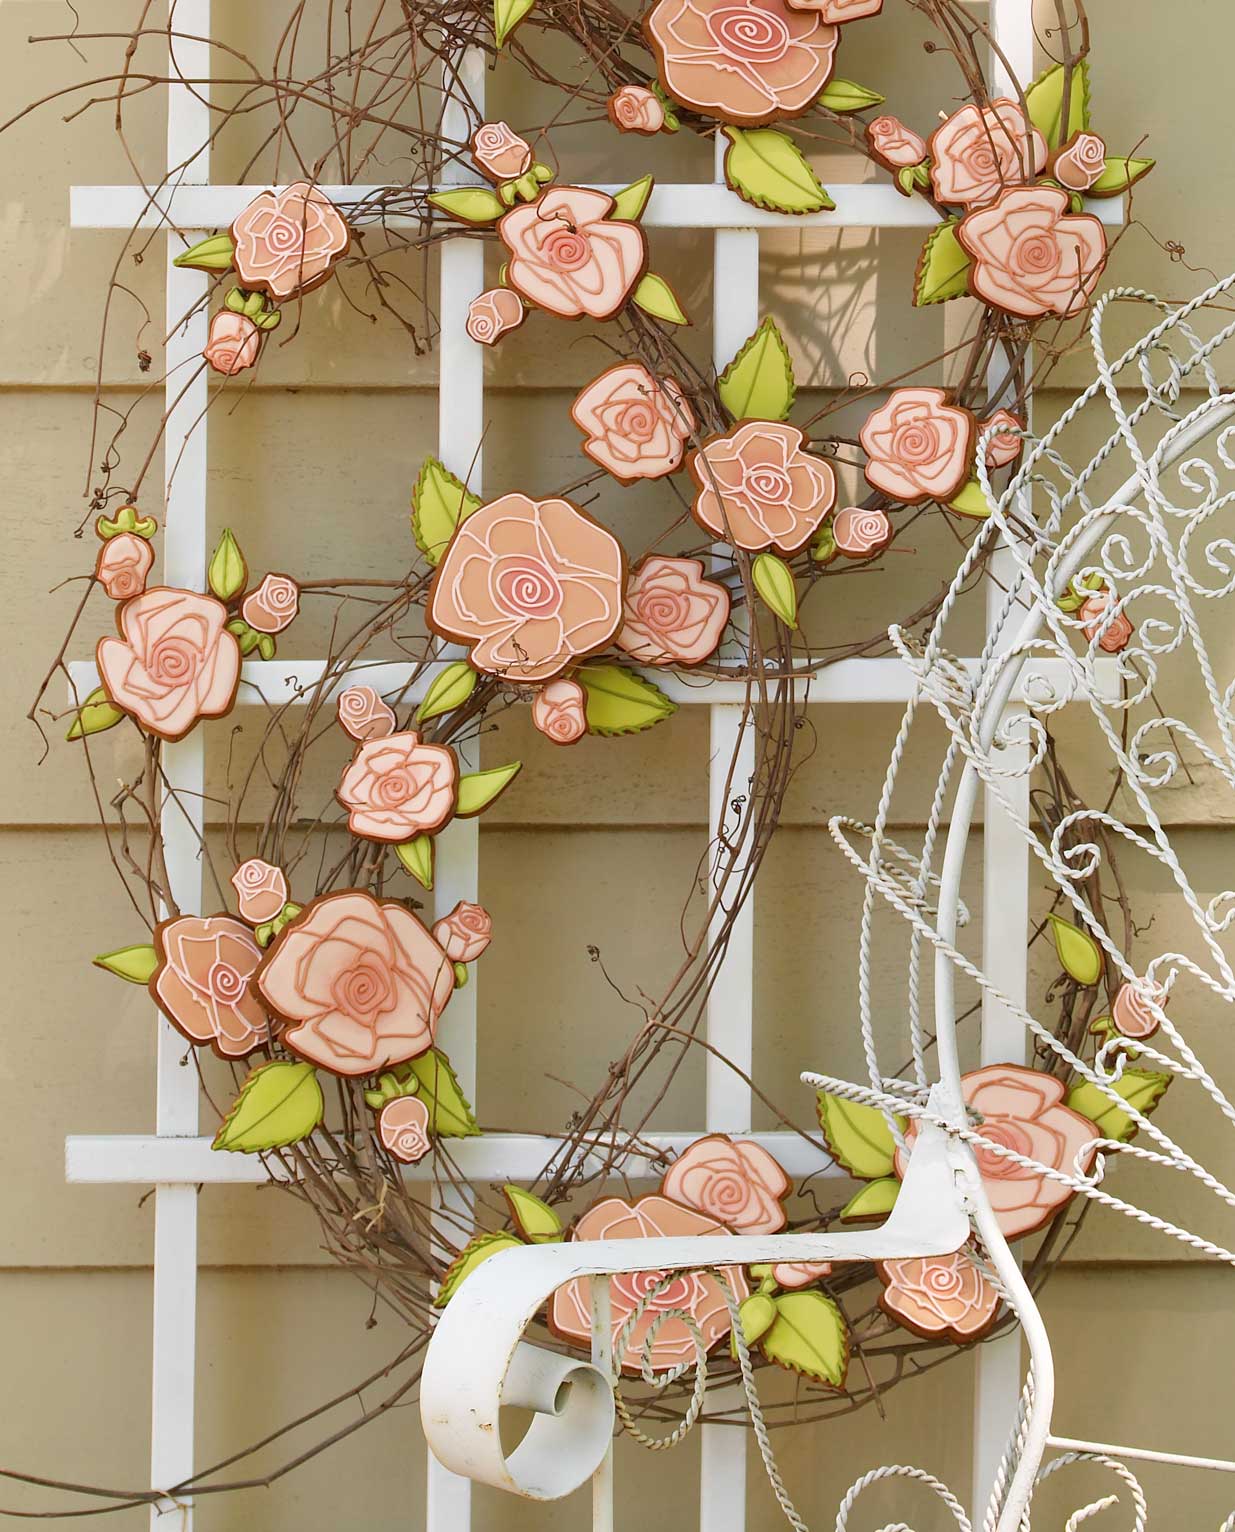
Tired of the standard cello bag and ribbon for tying up cookie favors? I was, so I took a new approach for my garden party featured in Cookie Swap. There (third photo from top), I wound grape vines through a trellis and then glued on decorated rose and leaf cookies with thick Royal Icing. As guests left the soirée, they were invited to pick their favorite rose from the bunch. Note: This is one project that you’ll want to take lying down! Don’t lift the trellis into an upright position until the icing “glue” has completely dried (usually overnight).
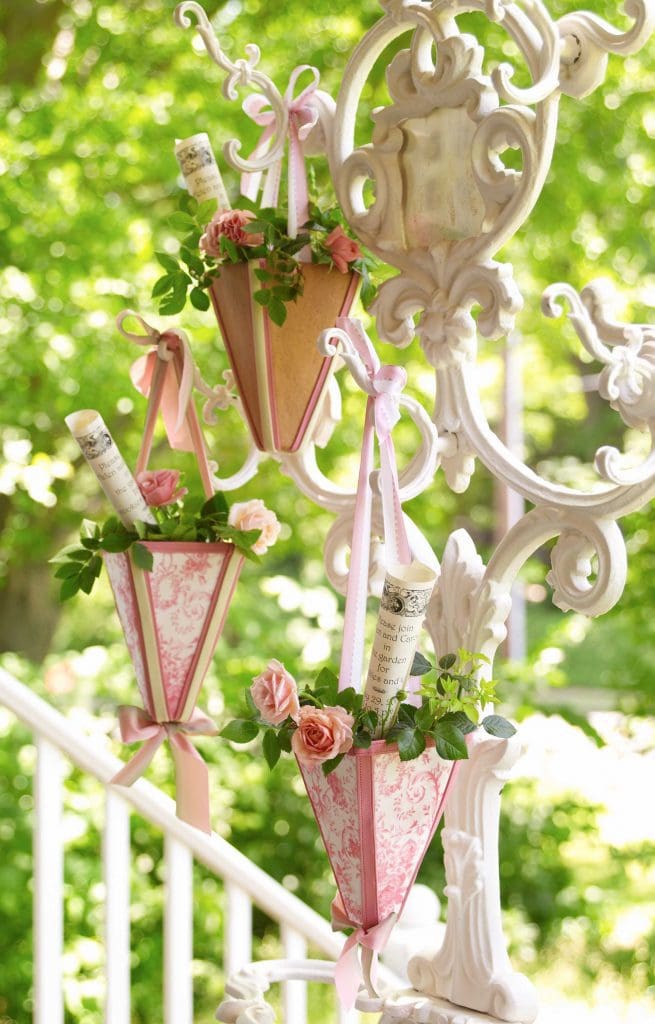
For the same garden party, I managed to work cookies into my invitations as well! Using four triangular cookie panels for each basket (some plain and others iced and covered with toile wafer paper), I assembled edible May Day baskets and then filled them with flowers and scrolls printed with the party details. I used fresh flowers, but crystallized flowers could also be tucked inside to give these gifts a longer hanging life. Note: Assemble the cones open-side down by gluing the seams together with thick Royal Icing and propping in place until dry. I finished the seams with strips of rolled fondant, but you could pipe icing borders along them instead. And, of course, take care not to overload the baskets, as they are naturally somewhat fragile.
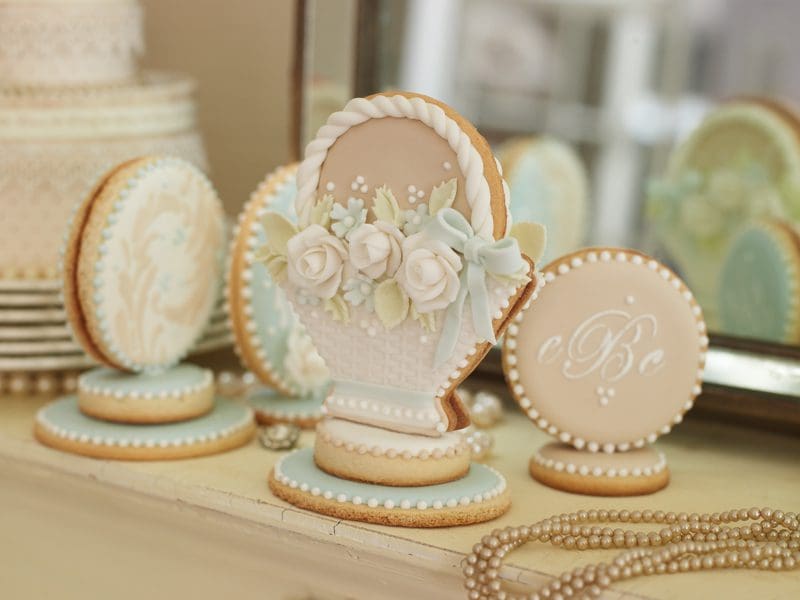
These cookie cake toppers (fifth photo from top) are another very simple variation of my place cards – just two identically decorated cookies glued back-to-back on top a of a cookie pedestal. I stenciled the monograms and patterns on the right and left toppers, but you can make a topper out of almost any other design. For instance, to make the center cookie basket, I embellished an iced cookie with fondant floral appliqués.

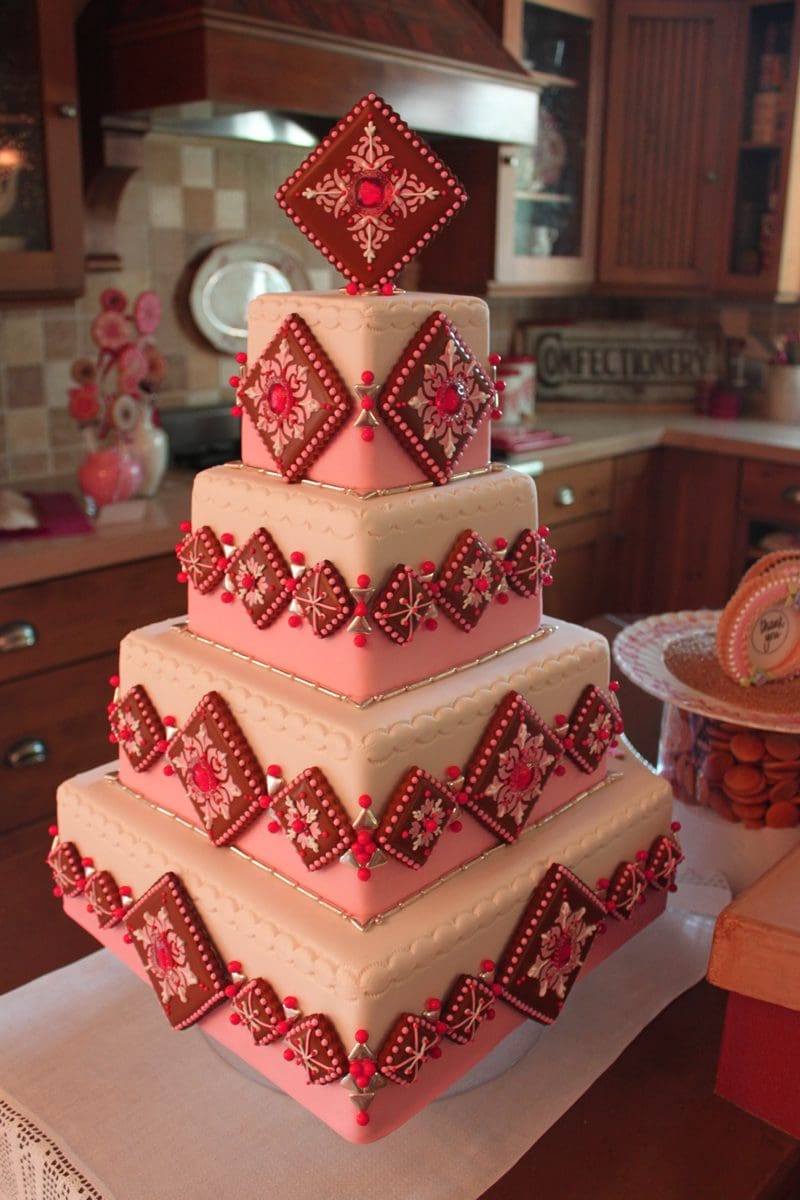
Cookies needn’t be relegated to the top of the cake (though that’s certainly an illustrious spot)! In fact, there are at least a couple of advantages to decking a cake completely with cookies, as shown in the sixth photo from the top. The cookies can be plucked off before serving the cake and handed out later as favors – or they can be nibbled on while the cake is being cut, thus distracting guests from the usual downtime between dinner and dessert. Note: If the cookies are going to be planted mid-tier, such that they’re not resting on the tier immediately below, it’s best to anchor them with thick Royal Icing to a fondant-wrapped cake. Buttercream will get soft as it sits on display and can lead to sliding of heavier cookies.
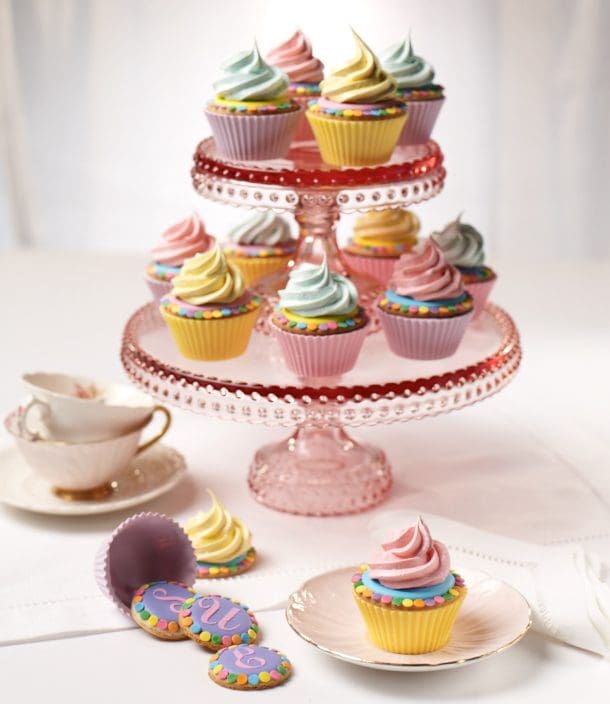
By virtue of its height, this cookie display makes a tantalizing centerpiece. The cookies inside each “cupcake” are stenciled with guests’ initials, so the individual cupcakes can handily serve as place cards or favors as well.
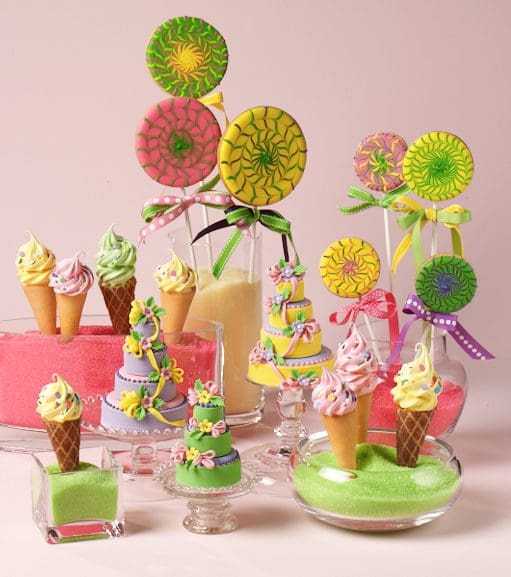
Another tempting cookie centerpiece, this one is assembled from an assortment of cookies mimicking other sweets. Graduated cookie rounds are stacked one on top of the other to create luscious little “cakes”; “soft-swirl” meringues top off tuile cones stenciled with cocoa powder; and marbled rounds are glued to lollipop sticks with thick Royal Icing to make over-sized suckers. The lollipops can be one-sided, or if the centerpiece is to be viewed from all sides, sandwich two like-cookies around the end of each stick. Again, you’ll want the icing “glue” to dry completely before attempting to lift the sticks.
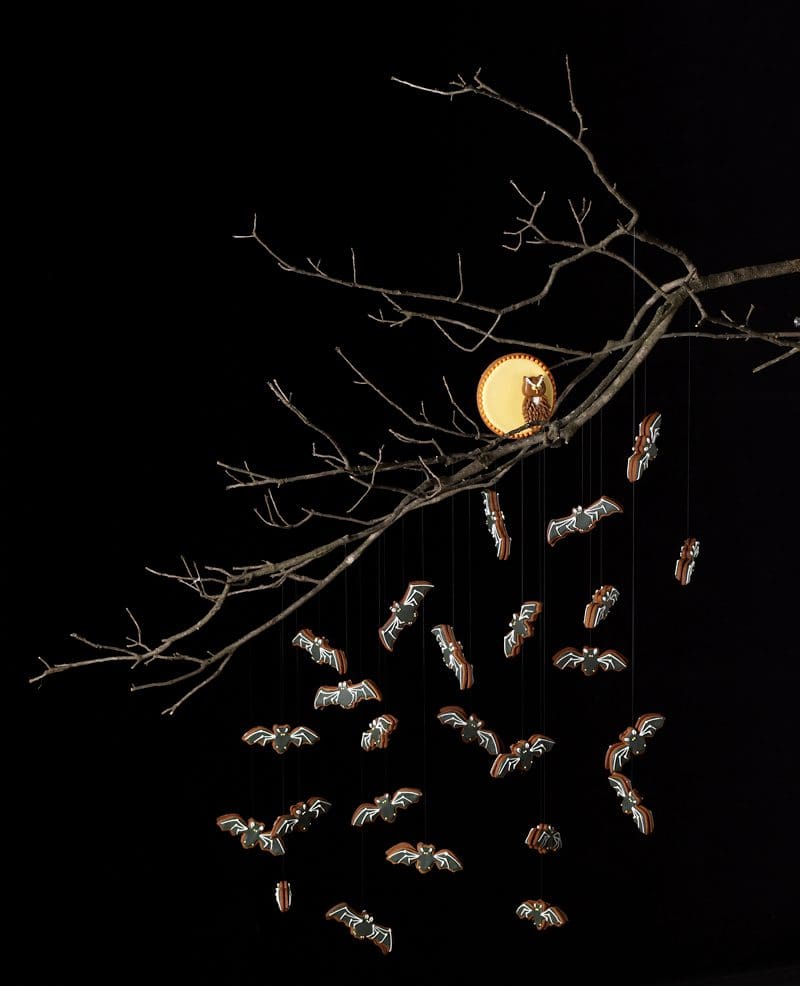
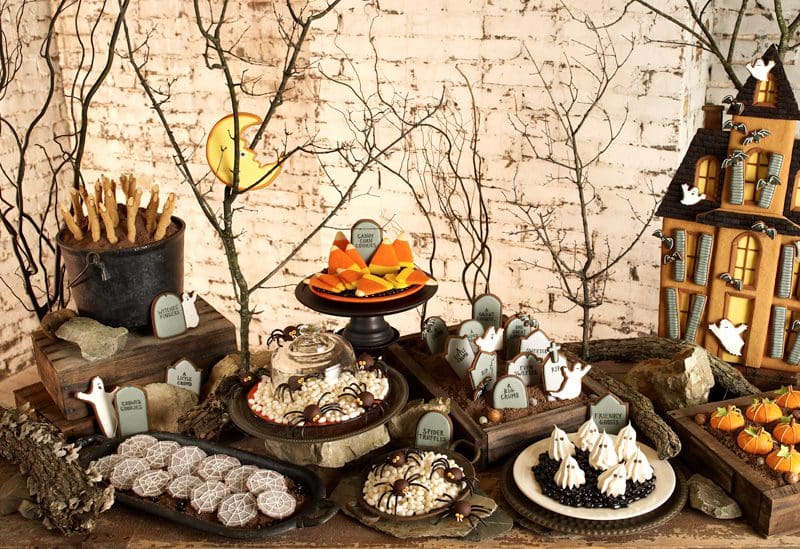
Who said cookies need to sit stacked on plates? I certainly didn’t! My aerial display of bat cookies (ninth photo from top) not only serves as a party focal point, but also sets the stage for a rousing game of “Bite the Bat.” Simply suspend the mobile from something sturdy; then spin around your guests. The one to bite the most bat wings in a certain time gets a special cookie gift.
Heck, why leave cookies at the centerpiece when they can be the underpinning of an entire tablescape (tenth photo from top)?! Even the tags that identify this party’s cookies are made of cookies! And the “dirt” on which the cookies sit? Yep, in most cases, it’s ground cookies! Better yet, whatever guests don’t eat on the spot can easily be bundled into take-home gifts.
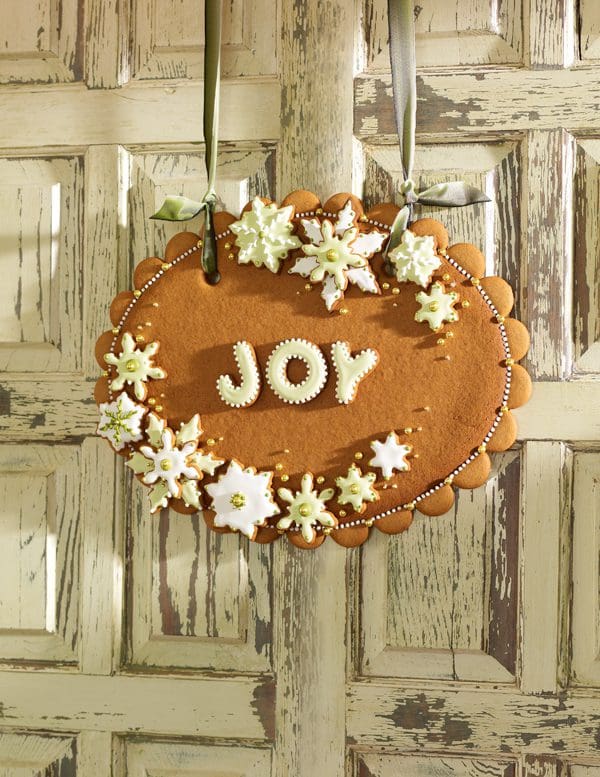
Set the cookie theme from the party’s get-go with an edible greeting like this one on my kitchen door (sixth photo from bottom). Not feeling enough ambition to make a project of this magnitude? Then scale down the sign to something closer to place card- or favor-size. Note: As always, the cookie pieces are glued together with thick Royal Icing; anything thinner takes longer to dry and can lead to cookie sliding in the meantime. To hang the sign, remember to cut two holes in the cookie top before baking and to let the icing “glue” dry completely before lifting.
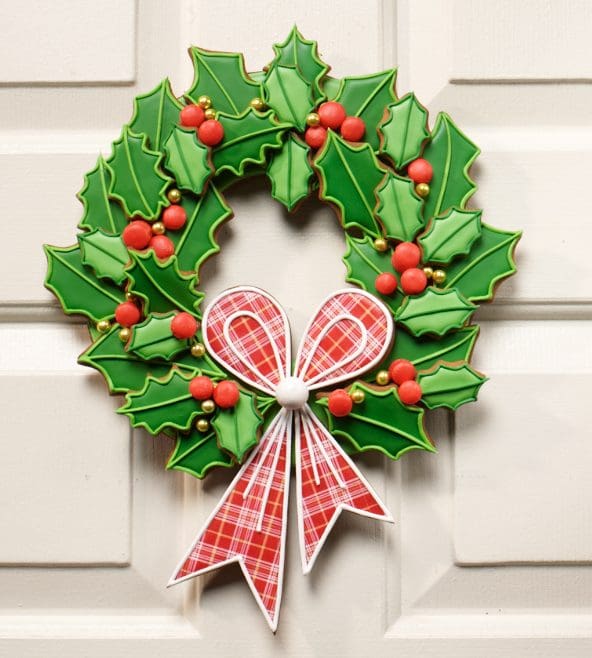
A holiday wreath needn’t be just a decoration. In the case of this one designed for my book Ultimate Cookies, every bit, down to the gumball bow knot, is intended for eating. The wreath can be hung once all of the icing “glue” has dried. Or the pieces can be arranged loosely on a platter, without any “glue” holding them together, to allow for more spontaneous sampling. Note: The bow was cut using custom cutters of my design; then it was iced and covered with plaid wafer paper once the icing had completely dried. For all you need to make this wreath, check out my project kit on fancyflours.com. You’ll find some other fun Ultimate Cookies kits there as well!
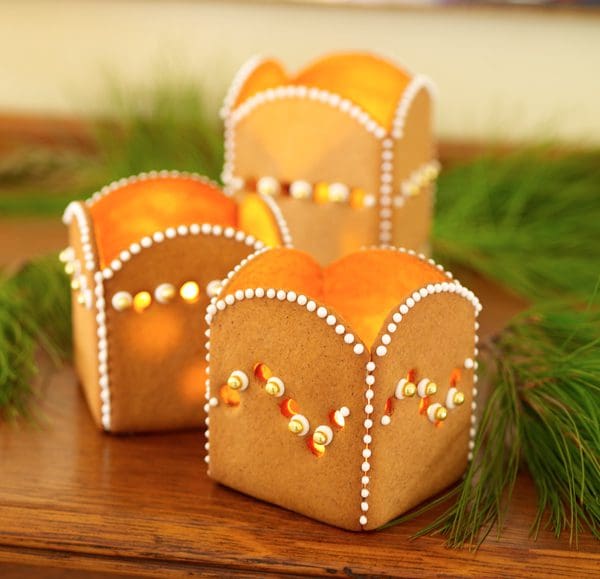
I can think of many motives for these votives (fourth photo from bottom)! Made of my special spicy gingerbread, they not only cast a warm glow, but they smell and taste great too! To make, simply cut out four cookie panels (per votive) and a series of holes or other shapes in the sides before the cookies bake. Once the cookies have cooled, add decorative icing details to each panel; then glue the cookies together at the seams with thick Royal Icing. I like to bevel the edges of each cookie before gluing to ensure the tightest of possible fits, and to apply “glue” more generously from the inside where it’s less likely to be seen. I also always assemble large 3-D cookie projects, like these, on pieces of heavy-duty cardboard so the cookies can be easily handled or moved, if needed, while still drying.
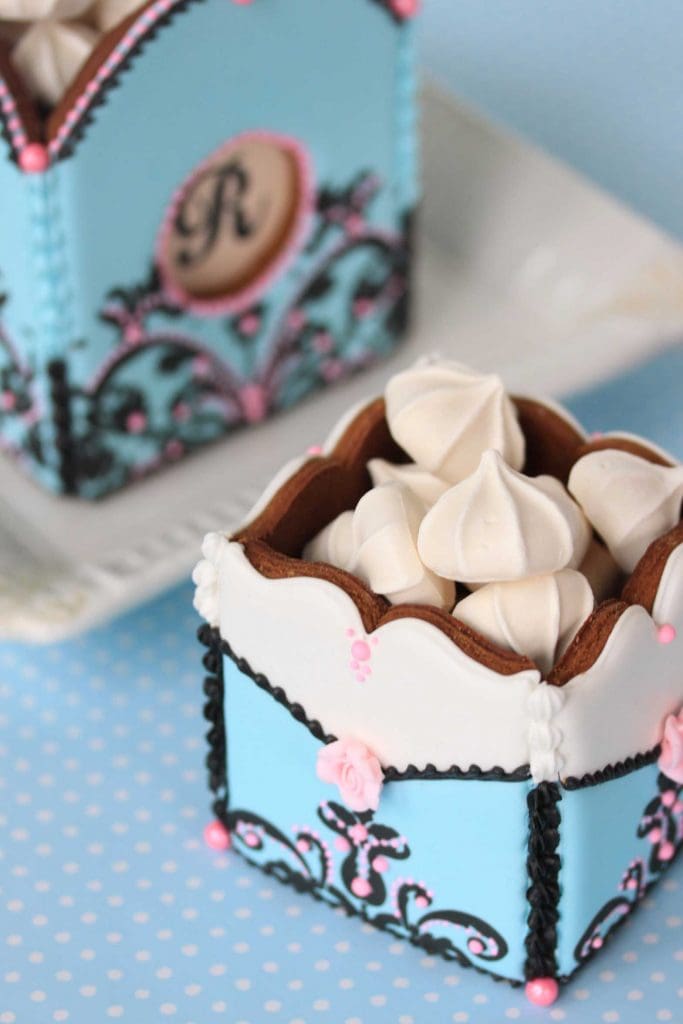
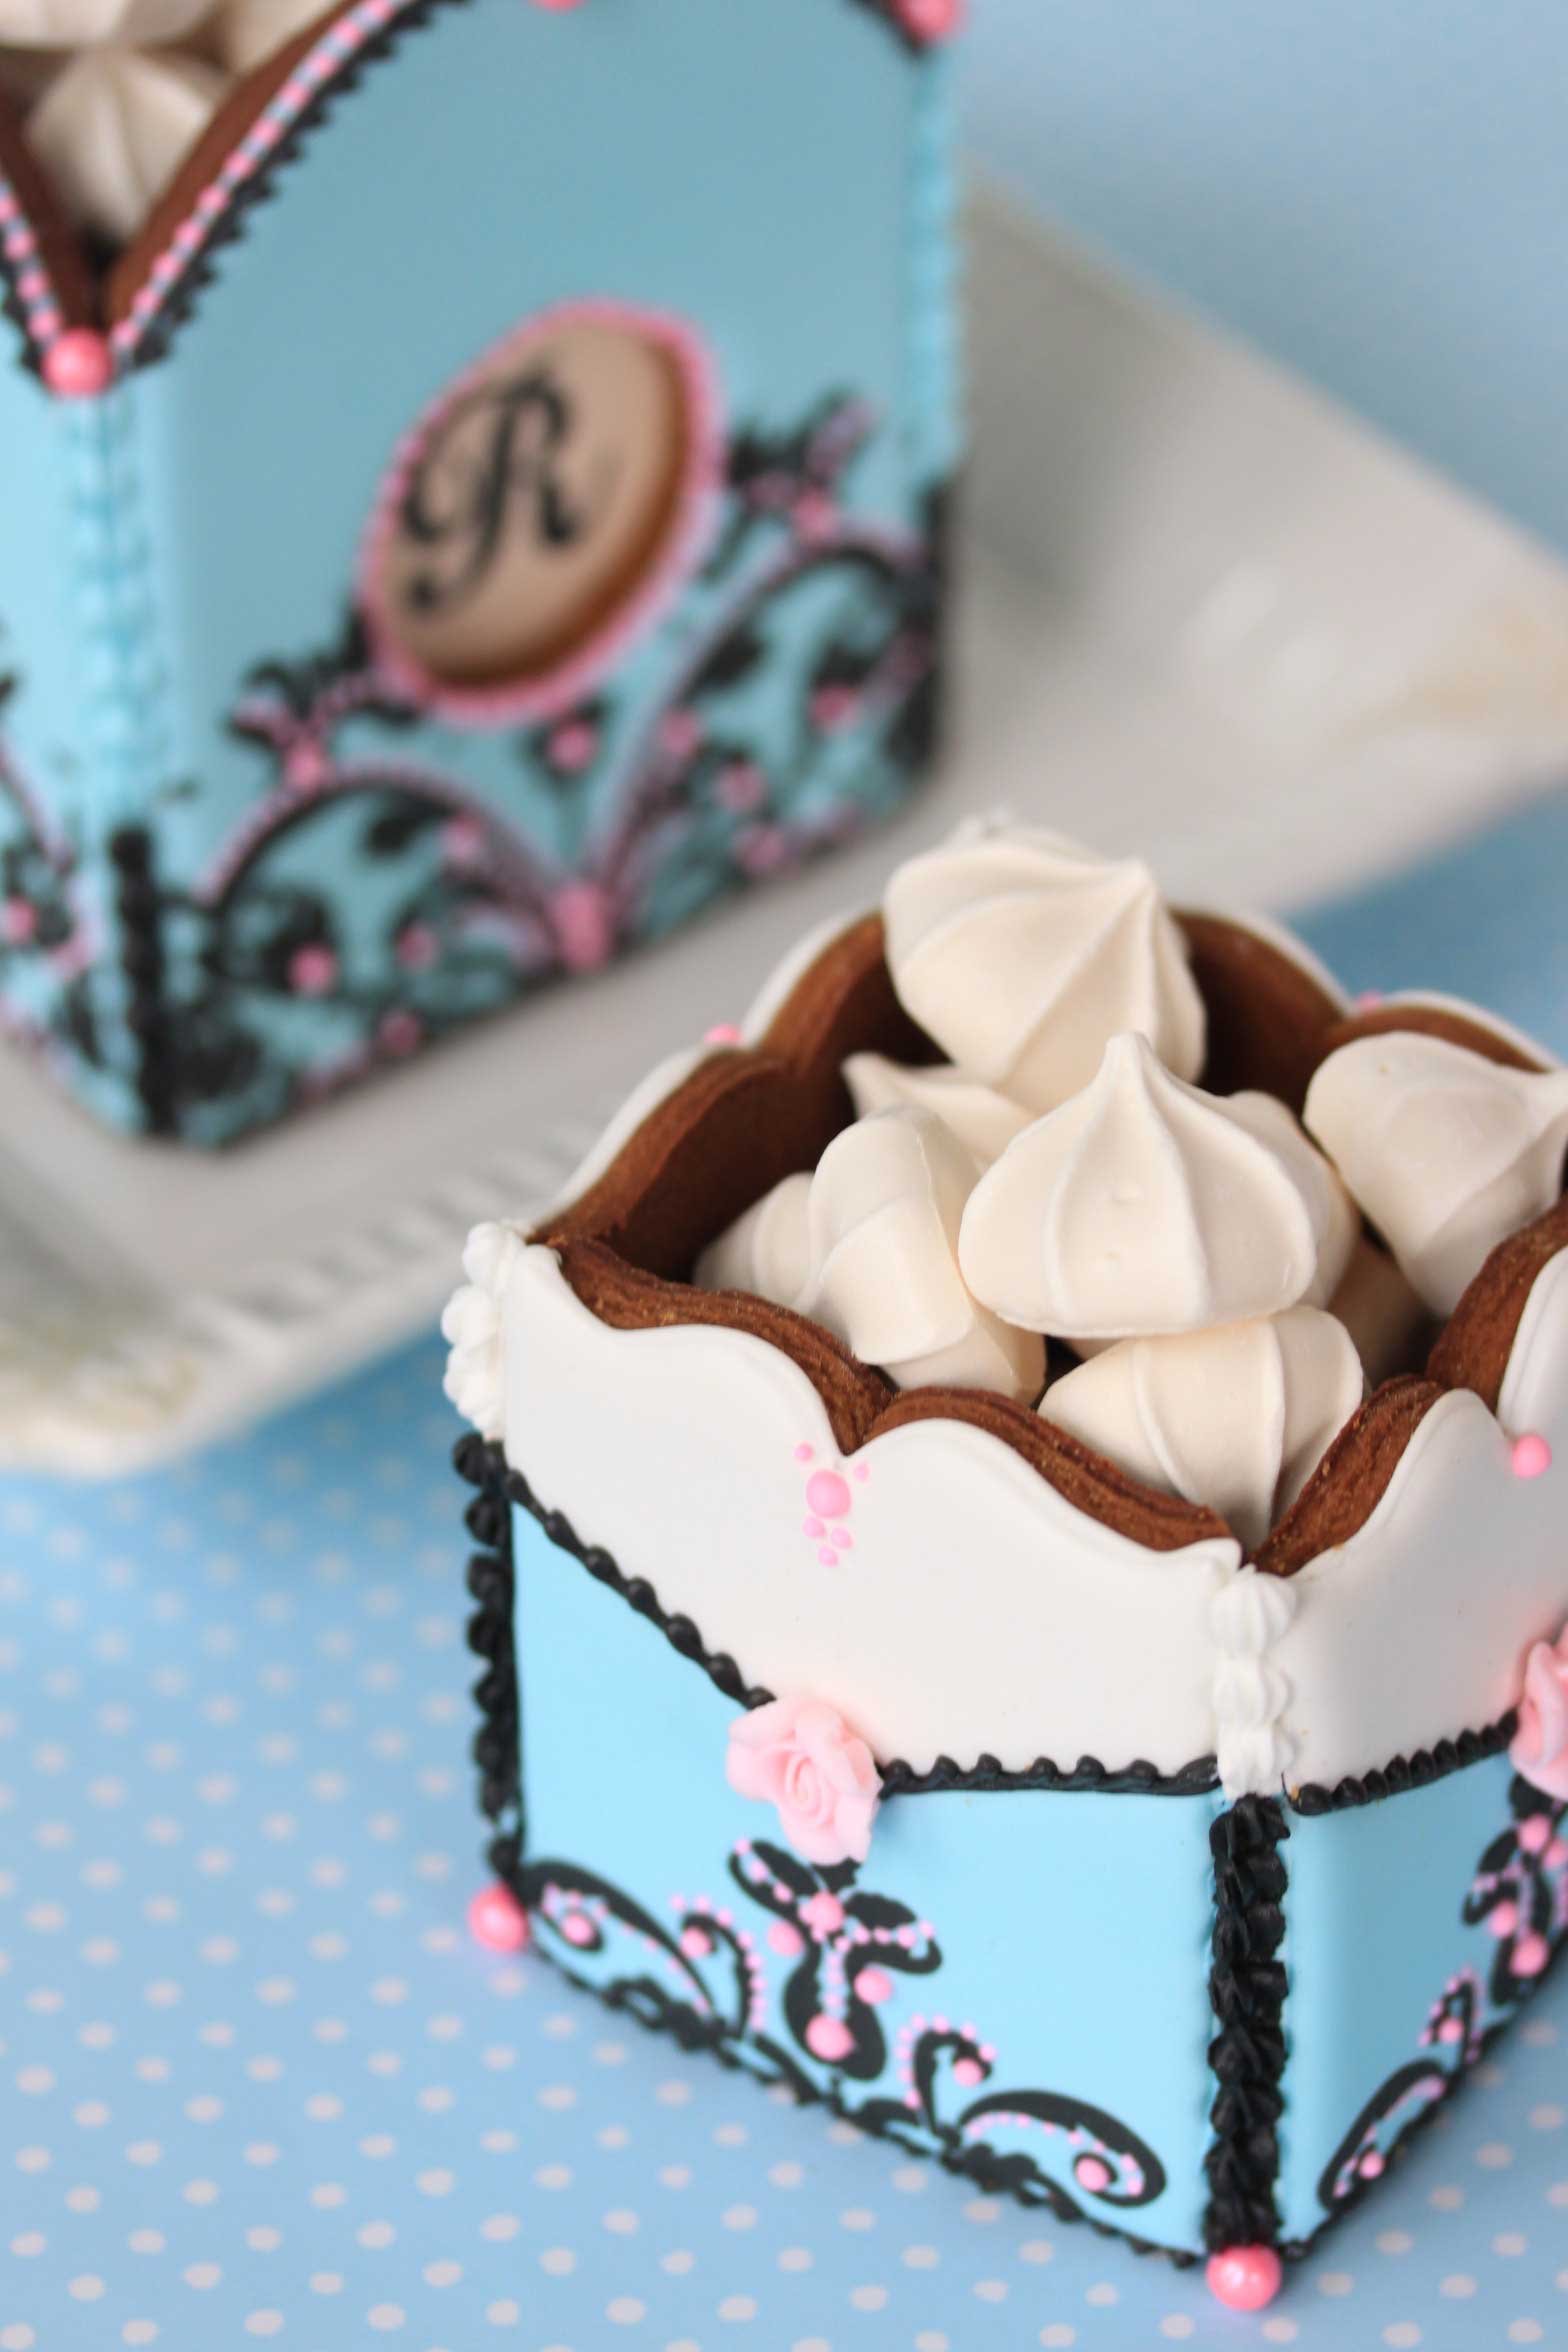
These cookie boxes (third photo from bottom) are a favorite of mine for holiday cookie swaps. Constructed much like the votives above, except with box bottoms, they make great take-home containers for other treats. And when the cookies inside are gone, the eating continues with the box! As with the hanging baskets in my Cookie Swap garden party, it’s best not to overload these boxes, and/or to support them from the bottom with pretty plates. Note: For some side interest, I cut a large window in opposing sides of each box. But instead of leaving those holes open as I did with the votives, I backed each with a smaller cookie iced in light green. You could also decorate the side panels completely if you wanted a jazzier effect.
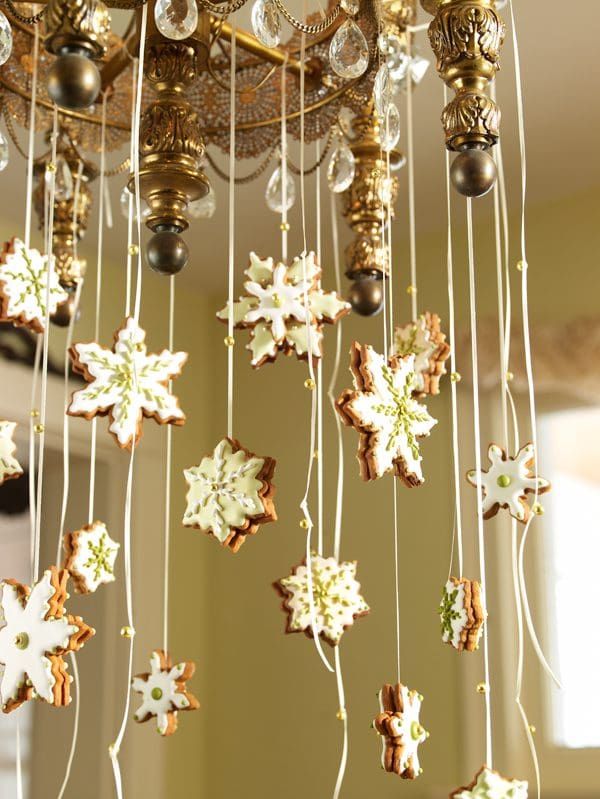
Another aerial cookie application! Here, snowflake cookies are sandwiched with thick icing around silky ribbon embellished with sugar beads. Once the garlands are dry, I like to dangle them over a larger cookie table as an added edible focal point.
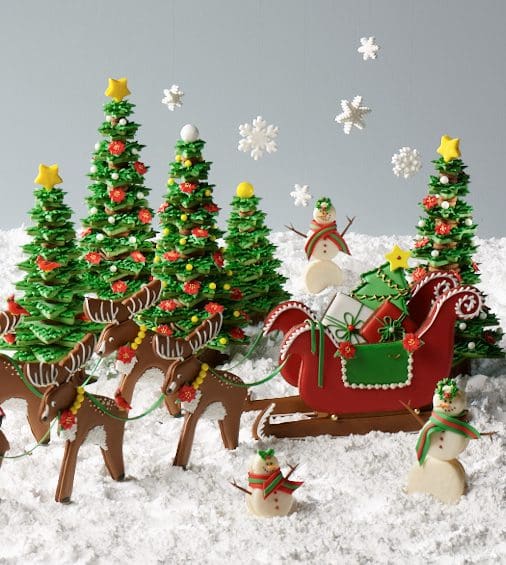
This cookie centerpiece (bottom photo) may look elaborate, but it basically draws on the same assembly techniques that I’ve already discussed. The sleigh is glued together as described for the votives and cookie boxes, except that the cookie corners require no beveling because the sleigh isn’t designed to have sharp seams. The reindeer stand on their own with no teetering, because each foot is mounted to a small cookie pedestal like those used on my place cards and cake toppers. (You just can’t see them because they’re covered with powdered sugar.) And the trees are nothing more than an extension of my stacked cookie cakes, except that they’re made with cookie stars and stacked much higher!
So was I right, or what? Cookies should be on the top of the guest list at every party! For more cookie décor ideas, please check out my books Cookie Swap and Ultimate Cookies if you haven’t already!