Royal icing is hands down my favorite icing for cookie decorating. The egg whites in royal icing make it faster drying than confectioner’s icing, where the liquid content is usually milk or cream, and better for fine detail work, as it’s less prone to spreading. Use this thick formulation as edible glue for adhering sugar dragées and fondant appliqués to cookie tops, or for piecing together 3-D structures. For outlining, flooding (aka topcoating), marbling, and other cookie decorating techniques, just thin with water per my consistency adjustments until the desired consistency is reached.
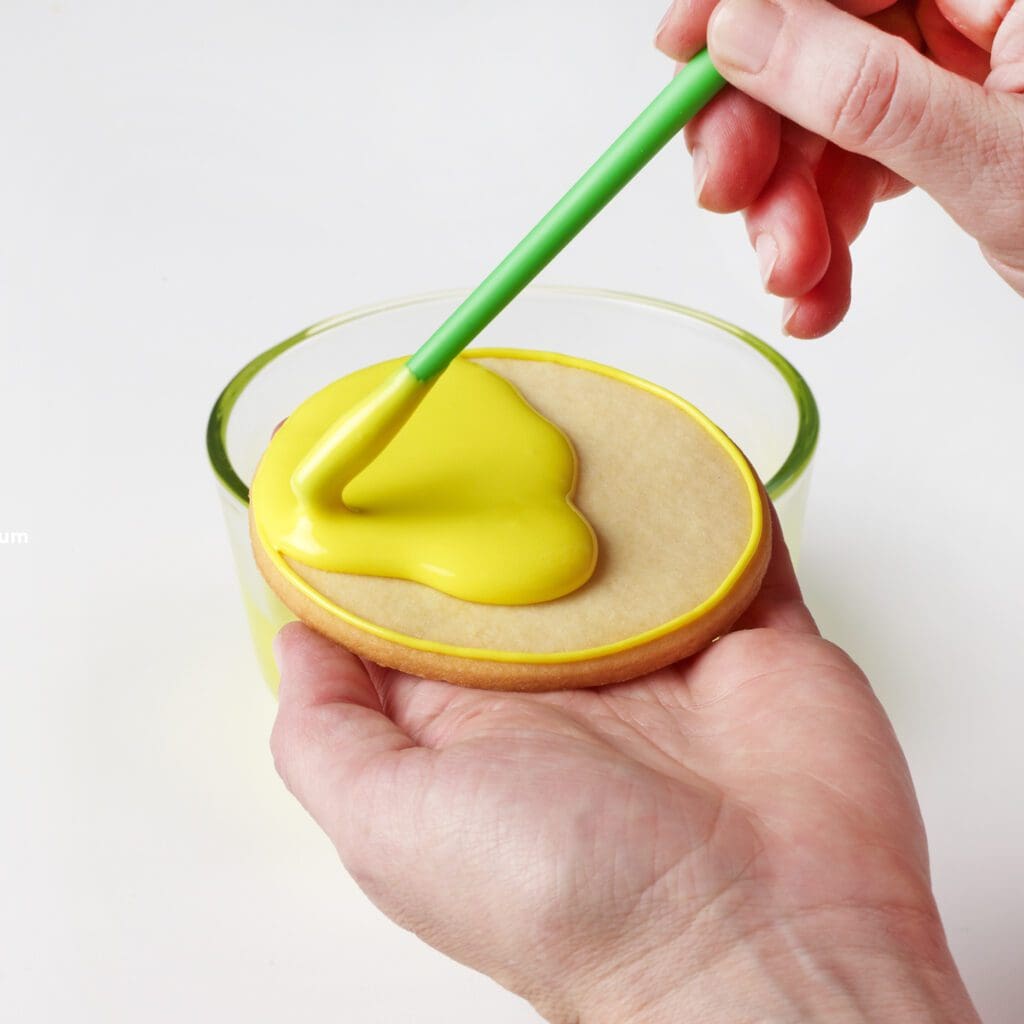
About 4 1/2 cups (2 1/4 lb/1.0 kg), enough to topcoat/flood 4 to 5 dozen (3-in/7.6-cm) cookies
1 | Mix the powdered sugar and cream of tartar together in the bowl of an electric mixer. Stir in the egg whites by hand to moisten the sugar. Fit the electric mixer with a paddle attachment, and beat the mixture on low speed to evenly distribute the egg whites. Turn the mixer to high speed, and continue to beat about 1 to 2 minutes just until the icing is silky and very white. (The icing will lighten and thicken as you beat it.)
Take care not to beat the icing any longer than is needed to turn it crisp white, and to only beat it at high speed at this very thick consistency. Extended beating, especially of looser icing, can pump a lot of air into it, creating tiny (or not so tiny) bubbles that can be difficult to eradicate once incorporated.
The icing, at this point, should be quite thick, at what I call my “glue” consistency. It should be so thick that it clings, nearly indefinitely, to a spoon, or plops off with a few aggressive shakes. (For a visual guide, see photo 1 in the gallery below.)
2 | Beat in flavoring and/or coloring, as desired. Again, take care not to overbeat for the reasons noted in Step 1.
The following consistency adjustments are approximate guidelines for 1 cup (11 oz/312 g) of thick, un-tinted royal icing, aka “glue”, as mixed per the recipe above. The addition of food coloring or flavoring, beating time, and normal variations in egg size can all affect the end-consistency of your icing.
If after making these adjustments, you think your icing is too thin or too thick for your application, don’t worry. The icing consistency can be adjusted at any stage of the decorating process simply by stirring in sifted powdered sugar to thicken, or water to thin. Remember, at this stage, it is important to gently stir in (not whip on the mixer) any additional water. As the icing loosens, you’re much more likely to kick air bubbles into it even with modest stirring.
For putty: “Putty” is a term I coined to convey super thick royal icing that can be shaped and modeled, much like fondant (though putty is less flexible). To make royal icing putty, simply add enough powdered sugar to my thick royal icing “glue” until it becomes a thick paste that doesn’t stick to your hands (or only sticks minimally).
For roses: I prefer a very thick icing, thicker than the “glue” consistency coming off the mixer, but a fair bit thinner than “putty”. It should take some work to stir the icing at this consistency.
For outlining aka piping: Add 1/2 to 3/4 teaspoon water to 1 cup icing “glue”. For crisp, well-defined outlines, start with 1/2 teaspoon water. If the icing is too thick to easily pipe through a small (1/8-in/3-mm or less) hole in a parchment cone, gradually add more water. When piped, the icing should hold a thin line with no – or minimal – spreading (photo 2).
For stenciling: Generally, 1/2 to 1 teaspoon water (per 1 cup icing “glue”) works best, though the exact quantity will vary with the size of stencil openings, the distance between stencil openings, the degree of stencil coverage, and other factors. The icing must be thin enough to easily spread into the stencil openings without leaving tracks or peaks when the spatula or stencil is lifted. At the same time, it must be sufficiently thick to keep from creeping under the stencil into areas where it is not wanted. It is better to err on the thicker side, especially with very fine and closely spaced stencil openings.
For marbling aka pull-through work: A consistency thicker than flooding consistency (i.e., about 3/4 to 1 1/2 teaspoons water per cup of icing “glue”) usually works best, as long as all of the icings you’re using still marble fluidly without the appearance of “tracks.” The smoothest, sharpest marbling effect is also achieved when all icings are as close to the same consistency as possible.
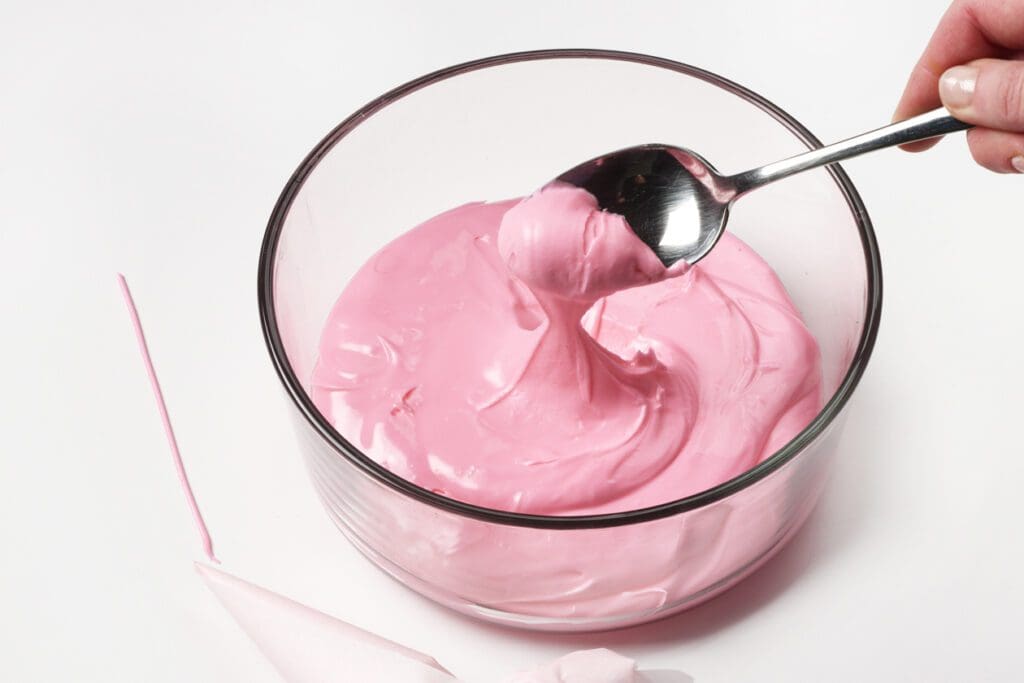
For flooding aka topcoating: To avoid icing run-off on cookies under 2 in/5.1 cm, start by adding 1 1/2 teaspoons water to 1 cup icing “glue”. Gradually increase to 2 to 2 1/2 teaspoons, as needed, to improve spread-ability on larger cookies. The icing should flow gradually off a spoon (photo 3) when at the proper consistency.
For dipping: Generally, an additional 1 1/2 to 2 teaspoons water (per 1 cup icing “glue”) works well, with the larger quantity needed on larger (greater than 2- to 3-inch/5.1-cm to 7.6-cm) pieces to ensure smooth coverage. When at the proper consistency, the icing should run gradually off the dipped piece and coat it relatively thickly (so you can’t see through it) without being so thick as to leave tracks.
For beadwork: About 2 to 3 teaspoons water (per 1 cup icing “glue”) works best, though, again, the exact quantity will vary. At the proper consistency, the icing will flow steadily off a spoon (photo 4), and a smooth, well-rounded dot will form when the icing is piped through a small (1/8-in/3-mm or less) opening in a parchment pastry cone (photo 5). If the icing forms a peak, it is too thick. Conversely, if it spreads a great deal, it is too loose.
Again, for a visual guide to proper consistency, see the photos in the gallery below or check out the following video (one of my very first YouTube tutorials), which goes into the above recipe and consistency adjustments in greater detail:
Lastly, for an explanation of the outlining and flooding techniques also shown in the gallery (photos 6 and 7), look no further than this YouTube video:

Be the first to hear about my latest events, tutorials, and product announcements by subscribing to my newsletter!
Schedule willing, I release one each month, roughly mid-month. And, guess what else?! Once you subscribe, you’ll receive a special one-time coupon code for 20% off my online tutorials. The code will be delivered in your subscription confirmation email, so keep your eyes peeled (as it cannot be resent). Thanks in advance for subscribing!
Live sweetly, Julia
52 Responses
Hi Julia,
Thank you for all your help.
Can you please tell me how to store the flowers after they have dried? does it have to be in an airtight container?
do I place them in the fridge?
Have a pleasant day.
Hi, Sharihan! You want to air-dry royal icing (be it flowers or on top of a cookie, or anything else) at room temperature. Royal icing is mostly sugar (which is hygroscopic, meaning it attracts moisture), so if you refrigerate it, it will never dry or it will sweat and get wet if it was once dry. Once pieces are dry, store them at room temperature in an airtight container.
This is helpful info! If I made royal icing decorations that hardened overnight and then put them on a buttercream cake and refrigerated that cake overnight, what would happen to the royal icing decorations? Would they soften and/or bleed?
Glad it was helpful – thanks for reading! The transfers could collect moisture and/or soften, but what will happen really depends on the humidity level in your fridge and whether the cake is covered or boxed to keep out moisture. They might end up okay, or they might not. The safest thing to do is put them on right before serving, or to test a few off the cake in the fridge overnight. Best of luck!
Hi, how long will this recipe store in air tight container and at room temp?
Hi, Mary, I like to use this icing the day it’s made, especially if tinted, as the color always sets more consistently for some reason when the icing is very fresh. I’ve stored it overnight at a very cool room temperature, but for longer storage than this, it’s best (for food safety reasons) to refrigerate the icing (it is perishable) and then bring it back to room temperature before using it. I also typically re-beat it (just for a minute or two) to bring it back together if any separation has occurred.
How long can you store it in the refrigerator?
It all depends. The longer it is in the fridge, the more it will dehydrate. So it’s best to use it within a few days, though you could push it longer. Again, as I noted above, be sure to bring it to room temperature and then re-hydrate it as needed before use. And, as I also noted above, I generally prefer to use all of my icing, particularly tinted icing, the day I mix it without storage in the fridge, as I find the colors set more stably.
If I were to use meringue powder with your recipe instead of egg whites, how many teaspoon would I use in place of the egg whites?
Hi, Diane, If you look in the “Prep Talk” section at the top of the recipe, I give instructions for this substitution, namely: “If using meringue powder, it’s best to follow the package instructions for reconstituting an egg white. In the absence of them, use 2 teaspoons meringue powder hydrated in 2 tablespoons warm water for each large egg white called for in this recipe. Be sure to hydrate with warm water to completely dissolve the powder; otherwise, your icing may end up gritty.” I hope this helps. Happy decorating!
Hello from Greece,
I really love your work and all the help you give us with your tips and guidance. I have only one question concerning the maintenance conditions. How long can the iced cookies be maintained and be safe for consumption?
Best regards,
Christine
Hi, Christine. Thanks for the kind words! The shelf life of royal icing-iced cookies is determined by the cookie dough and how quickly it stales, as, once royal icing dries, it lasts a very long time. So, typically, I store my fully dry cookies in airtight containers for 1-2 weeks, depending on how quickly the particular dough stales. If royal icing is made with meringue powder and you have not cross-contaminated it with something else, it dries overnight so there is little to no risk of spoilage or food-borne illness (if made and handled as noted). Hope this helps.
Hi julia
Thank you for sharing with such a detailed explanation. A small doubt, will royal icing with egg and meringue powder one taste the same? Or does one taste better that the other? Thank u once again
Hi, Jabs! I prefer the taste of all-natural royal icing made from scratch, which is partly why I make it. Meringue powder taste can vary from brand to brand and always tastes a bit artificial to me depending on the additives used. But taste preferences are so subjective; the best test would be to try both types and decide what you like best.
I’m curious why you would use meringue powder instead of egg white powder? Are the two interchangeable?
Hi, Kim. I usually make my royal icing with raw eggs, but, if you are concerned about salmonella and serving those at risk, then both meringue powder and egg white powder eliminate that risk because the whites are dehydrated and any salmonella present is killed in the process. I suggest meringue powder because it is more readily available here in the US. Meringue powder has some additives that egg white powder does not, but the two should be relatively interchangeable. Truth be told, I have rarely used egg white powder in this recipe because I can’t get it easily here, so I can’t say with 100-percent certainty how different the results might be, but I suspect it might dry a bit faster and be a bit more shiny since more highly concentrated with egg whites. (I used it a few times, as I recall now, in my international travels.)
I order in bulk here in the USA. I’ll give it a try and let you know if it’s unusable. 🤣
I’m sure it will be fine; it may just dry more quickly and more shiny (my guess based on limited use) because it is pure egg whites with fewer additives. I’ve used it a few times when traveling to teach internationally; I just don’t use it here in the US and therefore supplied no substitutions using it.
Hi Julia. I think your amazing! Your why I do sugar cookies and bake. Thank you.
The only thing I wondered is what powdered sugar brand you use, and egg beaters.
Hi, Debbie! Thanks so much for the super kind remarks. I use C&H powdered sugar, though most name brands (like Domino) here in the US are suitably fine (not coarse). I’ve really only encountered coarseness issues when working with powdered sugar in other countries. I most often use raw, unpasteurized egg whites, as I don’t serve most of my cookies (I use them for teaching). When I want to use pasteurized whites, I either use those in the shell (which you can find in some markets) or any liquid egg whites in the refrigerated section. I haven’t used the latter enough to have a strong brand preference, and, since they’re essentially pure whites with no additives, I don’t expect much difference from brand to brand. Meringue powder is also a good substitute for liquid pasteurized whites if you want to eliminate all risk of salmonella. (See the recipe above for that substitution.) I hope I’ve helped a bit. Happy New Year too!
Hi Julia. I really love your work. I’ve made your royal icing recipe. I was wondering if I could freeze it after one or two days in the fridge and then use it after a week or so.
Hi, Ourania! Thanks so much for your kind words. I don’t see why you couldn’t; many people do freeze their royal icing. I will say, however, that I never do because I have found that tinted icing always sets more stably for me (less/no mottling or spotting of color) if I use it the day I mix it. I also tend to mix the quantity I know I need so I rarely have leftovers. Of course, if you do freeze it, you will need to bring it back to room temperature, re-beat it, and possibly add some water to restore it to whatever consistency you need. It is likely to dehydrate the longer it is stored. I wish I could be of more help, but I just don’t have enough freezing experience to offer more tips.
Hi Julia,
Love your work. I have all your decorating videos in my favorites. some royal icing recipes call for corn syrup instead of egg whites. Apparently they make the icing shinier. What is your take on this?
Hi, Viva! Thanks for your kind words and loyal watching of my videos – much appreciated! Royal icing without egg whites is not royal icing (it’s glaze or confectioner’s icing, sort of, but these two icings usually use something other than just corn syrup as the liquid ingredient). As for royal icing, it’s the egg whites that make this icing dry quickly and hard. If you substitute all corn syrup for the egg whites, the icing will be extremely sweet and VERY slow-drying, and maybe never dry at all depending on your ambient humidity. What I think you heard is that some people add a couple teaspoons (or so) of corn syrup to royal icing made with whites (or meringue powder) to enhance sheen and flow-ability. Yes, some corn syrup will make the icing a bit shinier depending on how much you use, but, as noted, corn syrup delays drying time and can sometimes impede the icing from drying all the way through. Some people like the softer icing, but I don’t because it’s difficult to apply certain techniques (i.e., stamping, stenciling, etc.) to soft icing, and I find I get enough sheen on my icing just by drying the icing under dry ambient conditions (i.e., by setting the cookies in front of my open dehydrator to dry). I hope I’ve answered your question.
Hi Julia, yes you answered my question. Being an engineer myself love your detailed yet precise answers. Quick separate question: I know this answer depends on the shelf life of the cookie recipe. However have you ever frozen completely iced cookies? Does the icing stay well even after thawing them back? How do you thaw them?
Thanks for the sweet words, my fellow engineer! 🙂 I don’t freeze my iced cookies, as I’d rather not run the risk of anything happening to them (sweating and moisture-related issues) after I’ve spent so much time decorating them. Plus, they take up a ton of freezer space, and freezing always alters flavor, IMO. So I prefer to make to order so people are eating the freshest possible cookies that look exactly how I originally decorated them. Others swear by freezing iced cookies, however, and say they thaw in a sealed container (that they were frozen in) at room temp, and all works well. But I just don’t do this, so I have no direct experience to corroborate theirs.
I’m making extra icing for a ginger bread contest tomorrow. Can I make it tonight for tomorrow? I was thinking of making it the same consistency as outlining but wanted to make sure it will not thicken tomorrow
Hi, Diamond C! Sorry for the delayed reply but I have guests here for the holiday right now and I am not checking messages 24-7, especially on the weekend. You’ve probably already done what you need to do for tomorrow so what I am saying here may be moot. But . . . if you made the icing ahead, you’ll want to re-beat it and adjust consistency again – at least I would. Depending on how it’s been stored, it can dehydrate a bit overnight. Plus, as a general rule, it’s always smart to check your icing consistency right before you use it, particularly if for a high-stakes competition. 🙂 Best of luck!
Hi Julia!
I’ve used this recipe for years and I adore the taste. Something I still struggle with is air bubbles for my flood consistency. Do you think I’m over mixing early on? I try to pop all of the bubbles before I put my icing in a piping bag but I still see some bubbles just below the surface as my cookies dry.
Thanks in advance!
Hi, Laura! So glad to hear you like the recipe! Yes, I think you’re either over-mixing or beating a too-loose icing. The longer you mix a looser icing, the more bubbles you’ll introduce. Shorter mixing of a thick consistency will keep bubbles at bay. But it’s hard to say exactly where you’ve gone astray without actually seeing you mix it. I recommend using a paddle attachment if you aren’t, and adding the whites more gradually so you don’t introduce too much liquid and make the mixture too loose. (The latter holds true if you are not weighing the eggs, as even large eggs vary naturally in size, and not weighing introduces less precision into the recipe.) The mixture should be very thick while you are beating it, and only beat it just long enough for it to turn from gray-white to white-white. This could be under the time indicated in the recipe (a guideline only), if, for instance, your mixer is more powerful than the one I used to test the recipe. The other possibility is that you are mixing in too much additional water later (to thin to flooding consistency) or mixing it in too aggressively.
Hi Julia,
Am I blind or don’t you give any measurements for the “putty” and “roses”, e.g. how much more powdered sugar you add? I would be curious to know.
Thanks.
Hi, Jenny. No, you are not blind. I recently added those consistency adjustments to the recipe and haven’t measured them myself, because it’s frankly a pretty small amount relative to one cup of thick royal icing “glue” coming off the base recipe. For roses, I may add a few tablespoons to a whole batch of icing, for instance. I also think the visual and tactile cues I have provided are more instructive than any measurement, as your starting icing consistency, even with the best of measurements, may differ from mine, as could your capacity for piping the very stiff icing that I use for roses. Anyway, when I have more time, I will add measurements (in fact, I would like to convert ALL volumetric measures here to weights), but I can’t get to doing so for quite a while given the paying jobs I have in the hopper right now. That said, I would go with the visual and tactile cues I provided; you won’t end up far off the mark if you do.
Hi Julia, you are probably right that the visual and tactile cues are enough for now. I did manage to add some yesterday and would think it was successful. However, if you find the time at some point to add the weight, it helps as a first guidance if you are new to the subject.
And I am in Germany by the way, happy that you do weigh the ingredients, which is standard here, greatly appreciated.
I’m glad the visual/tactile cues worked for you. I’ll do my best to convert this recipe, but, again, I cannot commit to any particular timing right now. Just so you know, most recipes posted on my site were drawn from my books published here in the US, and the publisher wouldn’t allow me to use weights, as weighing is (still) not universal practice here. So I have hundreds of old recipes to convert, which all must be done in my “free” time.
♡♡♡ Labor of love. This was really fun to learn! Thank you for your time.
I feel Jenny’s pain. Cup and spoon measurements are a nightmare of inaccuracy. Resulting mistakes from such measuring can be so demoralizing when learning. I have both your books Julia and use them for constant inspiration. I have learned recently to go to your website for gram weights. If you ever publish another book, tell the publisher that you have followers (me and my friends) who have sworn to never – never to buy another cookbook that does not provide gram weights. We enjoy and appreciate all you do, Julia.
Sorry to hear about your frustration, but I get it – believe me.
Hi Julia, Love your youtube channel. Love all your videos and your knowledge on the subject. Have been subscribed to it for a long time.
Today I come with a question/problem that I recently encountered. Hoping you’ll be able to provide a solution. I made a large batch of royal icing using your recipe. I left it in the fridge. When I took it out a few months later it was all grainy. Didn’t know how to bring it back to being smooth pipable consistency. Any suggestions?
Hi, Viva Hat! I apologize for my very delayed response, but for some strange reason, I just spotted your comment today. My quick answer is I would never try to reuse icing that’s been stored in the refrigerator that long – not only does it dehydrate and lose its original consistency, but it’s likely not to be at all fresh (possibly even unsafe to eat if made with raw eggs). I typically use my icing the day I make it, especially if it’s tinted, as the coloring seems to set more stably (with less spotting/mottling) if I don’t refrigerate the icing (even overnight). Some people freeze their icing for longer term storage (to retain freshness), but I don’t for the color stability reason I just mentioned. If you do freeze it, you will need to bring it back to room temperature, and then re-hydrate it with water or egg whites to restore the original consistency.
Hello!
I am wanting to make my cookie glaze icing recipe without the white food coloring that contains titanium dioxide. I need the opacity that titanium dioxide provides but without the chemical. What can I substitute? Will cream of tartar provide the same opacity result in coloring the icing?
Thank you!
I have no idea what recipe you’re using, so it’s hard to guide you without that context. But if you use my recipe, it whips up very white, and I rarely (to never) have to add white food coloring to it. Cream of tartar keeps icing white longer (beating the icing incorporates air, which makes it whiter; cream of tartar is a stabilizer so, in that sense, it keeps the whipped icing structure intact longer and thus whiter longer). But if your icing isn’t white to start, cream of tartar won’t make it that much whiter because it’s not a food-colorant.
Hello, if I wanted to pipe a shell boarder on a cookie what would be the best consistency option to use? I have a request to make cookies for an Octoberfest party and the traditional ones have a shell boarder. Thank you for you time
Hi, Colleen! For most textured borders piped with tips, I recommend starting with a relatively thick “outlining” or “piping” consistency as indicated above. The icing needs to be thick enough not to lose the definition created by the tip when piping, but not so thick that you can’t pipe it relatively easily through the bag. Don’t overfill your bag either (generally no more than half full); you’ll have more control this way.
I know flavors are endless but i am wondering what is your favorite royal icing flavoring for basic sugar cookies?
Lemon or almond, as those extracts don’t alter the color of the icing. But flavoring is so subjective. It’s always best to ask who you’re serving; many don’t love almond extract or only like it in small doses.
Hello Julia, your cookies are amazing, I’ve only just discovered your channel! Quick question about your royal icing – what are your thoughts on using corn syrup and/or glycerine in royal icing? I’ve read elsewhere that it helps the icing dry shinier, give the icing a little elasticity and helps it not to dry crunchy. It all sounds great, but I’ve had trouble with the stickiness/super stretchiness of it, so I’m looking for a new recipe. Is there a reason you don’t use it or do you just not need it because of all your experience?
Aww, what a sweet comment. Thank you! I don’t use either in my icing, as I find that if I dry my icing in front of or in a dehydrator, it ends up with a nice satin finish that I like. Further, if you add too much of either, the icing will never harden, which can make it difficult to do subsequent decorating steps, especially 3-D assembly, without denting the icing. I also don’t apply the icing too thickly, so the result is a thin candy-like coating next to a softer cookie, which I like. I hope this info helps you decide what to do, though I will say that the “best” royal icing is a matter of personal preference, and it may come down to trying a number of variations to determine what suits you best. Happy holidays!
Sou sua fã a anis anos seus trabalhos são maravilhosos., obrigada por compartilhar tanto conhecimento Deus te abençoe sempre
Ooh, thanks so much! It was wonderful to wake up to such a lovely comment on my site!
Hi Julia,
I am having so much trouble getting the perfect dots without a point on top when I release the piping bag. Any suggestions would be so much appreciated.
Hi, Rhonda! Sorry for the delayed reply; it was an especially busy day. It sounds like your icing is just too thick; try adding water to it very gradually (I add water with a spray bottle), just until the dots settle into a rounded shape. But don’t add too much water, or the dots will spread and flatten more than you might like. Since the icing will be looser than what you’re probably working with and will flow/spread more freely, also be sure to only have a very small hole in the piping cone (or use a small tip). A smaller opening will give you more control over the dot size. I hope I’ve helped. Have a great weekend!